Fairy Tales Challenge - Final Submissions

Hello everyone. Wow, i finished! (⁄ ⁄>⁄ ▽ ⁄<⁄ ⁄) My Alice in Futuristic Wonderland.

Wonderful competition! I learned a lot of interesting techniques and got a new experience while working on this project. Thanks for watching and good luck to everyone! (─‿‿─):heart:

4 Likes

2 Likes

Modern Day Girl Dracula (Dede)

Phew! Made it to the end haha!

I’m really happy with how she turned out, despite being one of the more simple characters up here. I’m so glad I found this competition because it definitely pushed me to try things I wouldn’t usually. I learned ZBrush during lockdown after pretty much exclusively using Maya, so it’s amazing to see my progress!

Anyway, onto the girl herself:

Final Shot

Turnaround

Wireframe

Textures

WIP

Other stuff

Sculpted in Zbrush
Additional details in Maya
Retopology in Topogun
Texturing in Substance Painter
Rendered in Marmoset Toolbag 4
72080 tris

I’m kind of obsessed with her? Definitely have things I would change if I were to do it again, but I think one thing I’m proud of is letting her personality shine through.
While I was working on her I ended up nicknaming her Dede, because I figured she’d want to give herself a modern name after waking up in the 21st century!

Thank you for the really fun brief, and best of luck to everyone! I’m off to go update my WIP thread after neglecting it for a few weeks :grimacing:

12 Likes

I hope the judges will take my part in the competition, because my time zone has not yet finished the deadline and I did not think that it might be over, I really want to share the result of my work!
Tris = 30 180
Two 4K map sets
It was interesting to take part in this challenge from coming up with the character image to learning new techniques. This is my second experience in creating low poly models and creating textures and i really enjoyed all the process. In this work I tried to learn how to make high quality low poly hair. I tried to make textures that are more varied in color scheme and at the same time do not go out of the general style of the color scheme of the work. I wanted to make Dracula in the future, who have already lost part of their body because of which it was replaced with metal parts, but at the same time did not lose their vampire charm. I love the cultural image of Dracula in different ways, so I wanted to create a dark character but romantic at the same time.


https://youtu.be/dCSeg6Zn1Is
My artstation https://www.artstation.com/kain_gretxen
Progress Dracula's future

6 Likes

Here’s my final submission. Let me introduce you to the Way-Too-Heavy-Polycount-Peter-Pan (yeah that’s his new name since yesterday, when I just discovered that I were always wrong about polygons…). Sad truth, sad moment…

Yep, that’s true, I thought poly/tri-count was the number of FACES I had on my character… but sadly I just learned that it wasn’t… :upside_down_face:. Like I said in my thread (Fairy Tales Reimagined - Peter Pan Teenager), this is my first character from start to finish and I learned everything myself. I thought about every mistake I could have make and I made the simplest one… Nevermind, I will never forget what poly/tri count means. I promise :skull:

So I thought about throwing my brain on my computer and not posting my work then I told myself that it would be to bad not to show my work even if it doesn’t fit with the rules of the challenge.

So here is my Teenager Bad’ass Peter Pan. Hope you’ll like it.

Like I said earlier, this is almost the first time I’m making a character from start to finish. I mean concept, sculpting, retopology and everything, so in spite of this big fundamental mistake, I’m happy I did it. I learned so much stuff. Thanks a lot Flipped Normals pushing me to do my best (almost).

You can check the whole process in my thread : Fairy Tales Reimagined - Peter Pan Teenager

Project on Sketchfab : https://skfb.ly/onR6C

Instagram : @adrien_requin
Artstation : https://www.artstation.com/adrienrequin

Sculpting : ZBrush
Retopology/ Modelling : Maya & Blender
Textures : Substance Painter
Render : Blender Eevee
And some grading with Photoshop

Polycount… 156.398 :sweat:

Front, side and back views :

Wireframes :

Textures

Extra shots :

6 Likes

Concept/Synopsis

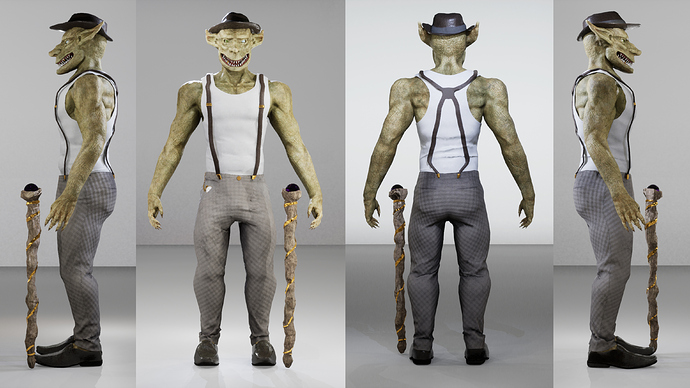
My version of Rumpelstiltskin is based around the 1950’s. His cover is that he is a door-to-door salesman but really he meddles with people and acts more like being a part of the mafia. He charms people by approaching them at their door and offers them deals they cannot refuse. He flaunts his gold and his figure to people upon approach. His figure has muscle build, but they are not as defined as he is slowly reverting to his small frail character with the more evil he commits from his devilish deals.

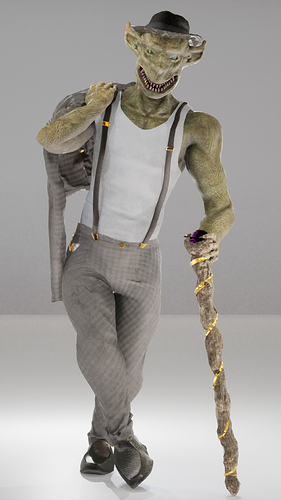
Final renders – Posed

This is my favorite shot that I have selected to be my final showcase image as I feel this best shows his uncomfortable yet intriguing menacing stare. I also chose to pose him leaning on his magical staff in a sly, overly confident and thuggish manner as I believe this shows his devious nature in a compelling way.

Final shot

All sides

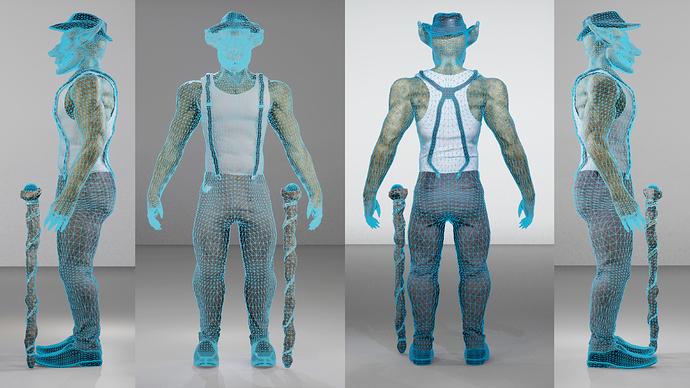
Wireframe

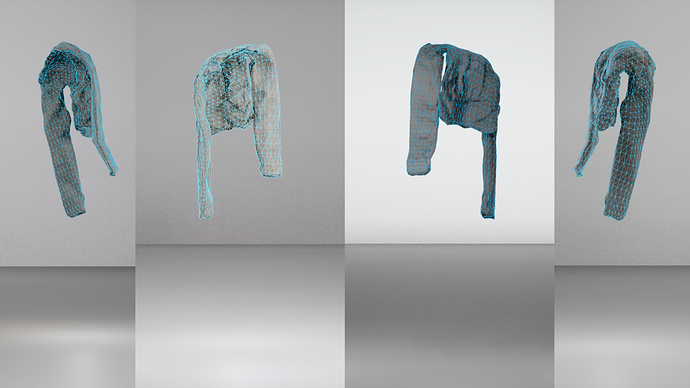
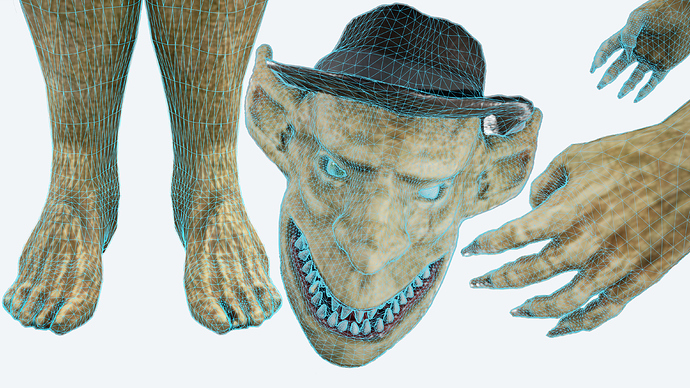
Thought it would be easier to assess the mesh with it in the rigging stance. I have uploaded the jacket and close-ups of the more heavy poly areas for investigation of the wireframe purposes.

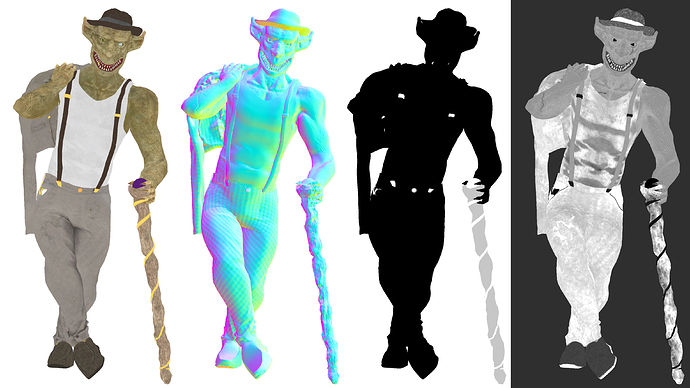
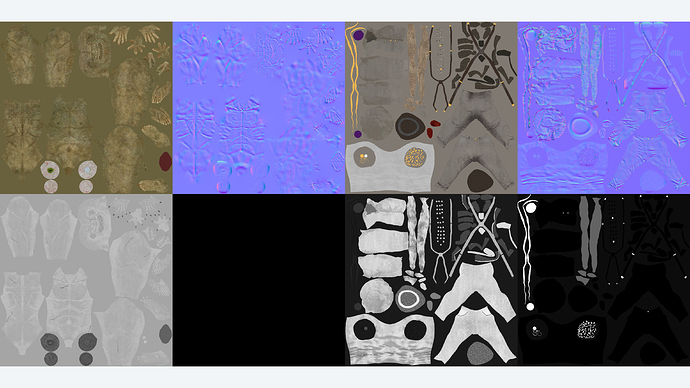
Texture Layers

Texture sets

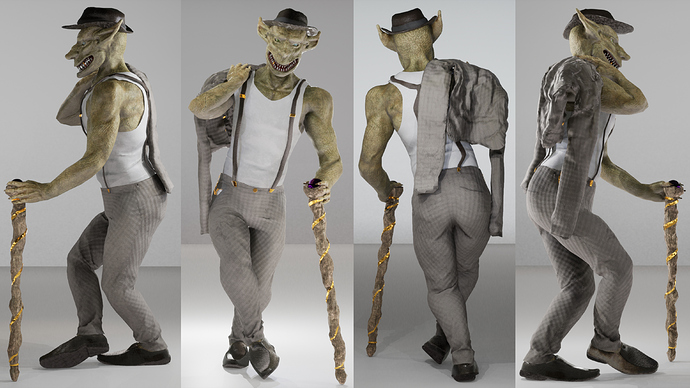
Additional shots in A-Stance

Software breakdown

These are the software’s I used and for what stage of the project

ZBrush: Sculpting

Maya: Modelling, Retopology, UV mapping and Rigging

Marvellous designer: Clothing

Substance painter: Texturing

Substance Design: Texture creation

Unreal Engine 4: Scene setup and Rendering

Photoshop: Layout of images for submission

Polycount

My overall design is optimised at a count of 76,276 tris. I could have further reduced the count by merging the clothes to the body sculpt but I preferred leaving his body sculpt intact in case the character was to be used again with a new appearance/attire, which I thought would also be non-destructive for potential future uses.

Bonus/Links

Since I had rigged the character, I decided to create a very rough and basic walk cycle and idle animation and bring my character to life in UE4. I wanted to see what he would look like alive and to test how game-ready he could be. I have included a hyperlink to where you can see a quick shot of him circling around my render scene in a movement test.

If you wish to find out more about my process please look at my WIP where I have added some more information on specific areas of this project. I’ll also link my Artstation that im trying to build.

Note: Thank you so much for running this challenge my goal for partaking was to refresh myself on what I know and what I need to work upon by working to a brief. This has helped set me on the right track to understanding and developing my skills as an artist.
3 Likes

“Calls herself ‘Red’, she’s been hunting the Bleeding Wolf Gang since they allegedly killed her grandmother 10 years ago.”
“What can one girl do against a whole gang?”
“Maybe you should ask those boys out back.”
“She did that?!”
“She did, and God help anyone that gets in her way.”

Red - A Film Noir Red Riding Hood

Turnaround

Texture Overview


Everything rendered in Marmoset Toolbag 3

Sketchfab Viewer - Simplified lighting

Work in Progress Thread

9 Likes

:bat:The Brides of Dracula - Noir style :bat:

Hi, everyone!
Finally my girls are finished :sweat_smile:
That`s my idea of vampires in 1930-1940s. Main direction of style is Noir films with character traits like “Femme fatale” image.
Sculpting was made in ZBrush. Retopo - 3D Coat. Texturing - Substance Painter. Baking and rendering - Marmoset Toolbag 3.

Here is the link to the WIP thread: The Brides of Dracula - Noir style

Side view #1:

Side view #2:

Backside view:

Low poly shot from ZBrush:

Maps (girl with gun has two 4k sets, and other have one):

Wireframe and tris count:


Thats my first contest and Im very exited about this. Hope you like my work :cherry_blossom:

4 Likes

Peter Pan Assassin.

Peter Pan (and Tinker Bell) as assassins and gender flipped! Pan and knives blocked in Blender, detail added in ZBrush, retopod in ZBrush and Blender, uv Blender, baking and texturing in Substance Painter. Photoshop and Blender for fixing bakes. The feathers and Tinker Bell modeled in Blender and textures done in Photoshop using the “lazy uv method”.

My WIP thread is here (and I will put a Sketchfab-link there once I have time to upload it).

Rendered in Blender Eevee. Two 4k maps. 98k tris. Computer crashes: 5

Wow, that was a wild ride! I remembered at the last second that bloom is a post-process effect, aka not flat, so I had to fake bloom with arealights on a plane in the background. Now I’m exhausted. Hope you all have had it less stressful! Good luck!

Edit: WOoops it was the textures that needed to be flat, now it all makes seance, that`s what happens when one double checks the rules at the last minute but is to tired to read English and is in an mad-art-berserk-deadline-is-ending-rage. Sorry if anybody was confused (I was). Ou well, we all makes mistakes, and it might be “more taste full” without the bloom. Now back to sleep.

Final:


The rest:


And finaly the on with bloom:

11 Likes

Fairy Tale Challenge - The Pied Piper of Hamelin

Hi everyone!
I am happy to show you the result of my work :blush:
Here is the concept: My idea for a fairy tale challenge, I’ll reimagine the Pied Piper of Hamelin.
My character lived to the distant future. He has upgraded his ability to hypnotize with new technologies.
He makes music with the power of thought from the trumpets in his body, which hypnotizes the victim.

Here is the link to the WIP thread Fairy Tale Challenge - The Pied Piper of Hamelin

Sculpting in Zbrush
UV and Retopo in Maya
Texturing in Substance Painter
Rendering in Marmoset Toolbag

Tris : 93 664
2x4K texture sets

Process

It was very interesting to participate in this challenge.
I really like the atmosphere here.
I saw many great artists and received support. Thanks everyone and good luck!

14 Likes

The Little Mermaid interpretation from my eyes. It was a very enjoyable and instructive character to work on. But i had very little time since I got involved a little late, like a week ago when i saw the challenge. I hope you enjoy.

Modeled in Cinema 4D and Zbrush, painted with Substance Painter and rendered with Marmoset.

Total vertices: 56k


3 Likes

The time has come to post my final version of my interpretation of the pied piper of hamelin. It has been a really great experience to participate in this challenge and I’m already looking forward to the next one. This is the very first challenge I’ve gone through and my second character (that I have finished) so I learned a lot in those last two months. I really want to thank everybody in this thread and of course everyone from the flipped normals team. You are amazing! Also many thanks to the judges who take their time and look over all this work. You’re also amazing!

So to the character. That’s him:


and his buddy:

(unfortunately blender let me down and now crashes everytime I hit F12 to render with eevee, so all I could do where viewportrenders with a rather low resolution. I’m sorry for that. Maybe I find a solution for that problem during the next days)


this is the flipped normals lighting scene for blender by the way.


In this texture set it’s mainly Cloth.

Here it’s the whole rat and the head and hands of the piper.

I wish I could have spent more time on the texturing but I needed to finish everything fast so I could still meet the deadline. That was quite a race but as I said, I learned a lot, so thank you one more time! It was a great time and I hope you like my character! Cheers! :slight_smile:

You can look into the process of the character creation here: the creepy piper of hamelin

8 Likes

Hello everyone,
My first ever made Videogame character, I’m happy that the contest led me to make a game-ready character (I have worked on concepts and CGI characters but I found this pretty challenging since I had not much of time and I had never retopoed anything for videogames :grinning: )
This character is based on a Persian fairy-tale folklore character called ‘Samak’ (Samak-e Ayyar).
The name Ayyar is generally used for a group of people who are famous by their magnanimity and the way they help people. Samak is also one of them, at some point he meets the prince of Iran who has gone to the China-Land (not The China!) to find the princess of China who is taken care of by an evil witch! The prince of Iran on his way to get to her meets Samak who is going to help him with the witch !
From here on Samak and the Prince make a covenant of brotherhood and the bigger journey begins!

In this scene you can see Samak going after an abandoned castle, He is trying to find the hidden way in by using the book he found, but it seems he is not the first one here… .

  • Two sets of 4k Maps (Not well-optimized since was my first one, but I hope I do a better job next time)
  • 75000 vertices (including the snow cards and the ground)
  • rendered in EEvEE
    -Sculpted In Zbrush, Textured in Substance

Without Volumetrics


Here is a render in cycle with a more middle eastern look that I intended (I just didn’t have time for working on lighting and rendering (and other things :joy:, also I didn’t have access to my unreal engine set-up)

WIP Thread:

My Artstation:

3 Likes

Hello everyone!

I’m finally done (well, that sounds wrong)! But anyway…

For this challenge I chose Cinderella who decides not to sit at home and wait for her Prince Charming but takes her destiny in her own hands and does what she wants (breaking her fancy shoes for example).

FINAL RENDER:

SIDEVIEWS:

Software used:

  • ZBrush: sculpting of the face and skin
  • Marvelous Designer: all the clothing
  • Maya: UVs, Rigging etc.
  • Substance Painter: baking and texturing
  • Marmoset: rendering

MAPS:
1st texture set (4K):


2nd texture set (4K):

Additional maps, I used to refine the skin. Though it was probably not necessary, I still wanted to test the workflow of realistic skin rendering in Marmoset.

I also used the 3rd texture set (1K) for the hair, because I needed an extra shader with anisotropic reflection. If it’s strictly against the rules, I can still make the girl bald ^^

UVs:


WIREFRAME & POLYCOUNT:

RIG:


Maybe an unnecessary step and a waste of time but I love to rig and skin characters to pose them so I couldn’t help doing it :smiley: I maybe will try and animate her one day…maybe.

Some additional close-up renders:

I also posted some of the updates in my thread here:
https://challenges.flippednormals.com/t/bad-cinderella-update-3

Final thoughts:

I decided to participate in this challenge, because I love making characters and with this one I had multiple goals:

  • learn Marvelous Designer
  • learn Marmoset Toolbag
  • improve my UV und texturing workflow
  • learn how to proper optimize characters

I’m happy I’ve actually managed to fullfill all these goals to some extent (one month is definitely not enough to even call myself a beginner but it’s a start :D). I learnt some cool new techniques in Substance, forced myself to use cards for hair and got some decent results, learn how to optimize polygons and not ruin the mesh in the process. All in all, it was definetely an interesting experience.
And I think I also leart one very important thing: patience.
If your Substance file (after loading for half an hour) looks like this:


…not throwing your poor PC out of the window requires patience.

Rendering of a proper turntable would take an eternity and a half, so I most likely do it tomorrow and post it in my artstation (self-promotion yay! :D):

6 Likes

Hi folks!

This is my Little Mermaid version! :mermaid:
These are screenshots from Unreal 4.


She’s a naive and curious young creature who lives in the ocean twilight zone, a layer of water below the ocean surface, just beyond the reach of sunlight. Because of that, her skin is pale and she has big fish eyes that help her see in the dark. Her seal ears allow her to hear better underwater cause the shape of our ears are meant to capture sound waves that travel in the air better than in water and the gills on her rib cage are part of her unique respiratory system. While living in deep waters, she longs to get to know the bright and colorful world on the surface, not knowing that her fate is as gloomy as the waters in which she inhabits.

I sculpted her high poly model in Zbrush and then retopologized her in Maya. Having in mind that she would be a real time character, I tried to keep my polycount as low as possible for optimization purposes and was careful to place edge loops around areas that would suffer more deformation in an animation process, like her face and fins. I also wanted to save some polys for a hair card method that would give me a nice hairline and a natural and flowy look, ready for games. I ended up with 20.523 tris for the mermaid and 20.638 tris for the hair. Her texture set was done in Substance Painter, the rig was done in Maya and the render is a screenshot from Unreal.

Mermaid 4096x4096 texture set

Hair 4096x2048 texture set

My work in progess is here: The Little Mermaid - Sea Creature WIP
And this is my portfolio: https://luizasg29.wixsite.com/luizagomes3d

Although this was not my first game character, it was my very first time in a challenge like this. To me it was especially tricky to manage time cause I tend to be very perfectionist and picky with a lot of details and sometimes this keeps me from moving on., but here I am! haha I loved the challenge and it was amazing to see so many awesome and creative works!

Good luck to everyone! :smiley: :four_leaf_clover:

7 Likes

Hi! This is my final submission to the Challenge.

For the challenge I reimagined the Captain Nemo (genderbender, why not) as a modern person. And, well, ship piracy is something rare in modern days, but the pirates just reinvented their thing! xD So, there she is: Nemo, a famous hacker, and her favourite work-tools: a very appreciated laptop named Nautilus. And of course, with bi-lights, as all pirates should be jaja.

-Modeling in Blender
-Clothes in Marvelous Designer
-UVs in Blender
-Textured with Substance Painter
-Final render in Marmoset Toolbag
-Tris: 96k
-Two 4k map sets

I will post my work later on Artstation: artstation.com/arienfay

Final render

Front, Sides and Back

Clay render

Wireframe

Extra images

Textures

4 Likes

Abyssal Empress Ariel
Hey everyone. It has been fantastic to roll into this project right after the grand space opera artstation challenge. I decided to take an evil twist on our familiar friendly mermaid. I really hope the community enjoys my piece. It has been a journey. This is the first character in over a year that I designed myself. I usually work straight off of concept. Grabbing references from under sea life like spider crabs, shrimp, gulper eels, angler fish and ringed octopi felt so on theme. I am aware that I did go slightly over budget in my poly count, but I hope with the complexity of my design that it is given a little leeway. Thank you for hosting this challenge, really helped me flex my 3D concepting skills (I spent the whole first month on just the sculpt).

6 Likes

Hello guys, this is my first time participating in a challenge and the first time made a character to real-time. I was encouraged by Vicky Hikari to join her in this challenge :slight_smile:
Was a great time to learn something new, I know I have so many things to take better, but I’m realy happy to finish this project!

Let’s start talk to my idea.
I choosed the The Pied Piper of Hamelin, thinking him in the Dieselpunk unirvese.
He using your flute to enchant your enemies.
So the Pied Piper runs and play your flute with yours mechanical arms.
He is a brave man, always does what is agreed.
But if you don’t comply with the agreement, probably the last thing you’ll hear will be the flutist’s song.

I used this softwares:
Blender for modeling
ArmorPaint for texturing
Unity for test the real-time rendering.

Render

Wireframe

Textures (I used 2K in the textures)

For animations I used Mixamo to help me make some animation tests.
Views in Unity

Video turn table made in Unity

Sketchab model

Topic with my WIP

If you read this far, thank you :slight_smile:
And good work for all you guys, I saw very nice jobs!
By Emanuel Leiros

5 Likes

Hi everyone, I finally completed my entry!

Rapunzel from the Future

Body: 29,114 tris
Cable: 32,448 tris
Gun: 14,336 tris
Total: 75,898 tris

Sculpted in Zbrush, retopology and UV’s in Blender, textured in Substance, and rendered in UE4.

Thanks to Flipped Normals for hosting, this has been a major learning experience and has helped me gauge my own abilities. Good luck everyone and thanks for reading! :slight_smile:

3 Likes

Dracula 3000 A.D Final submission
well this is the one Flipped Normals challenge I finished in time! (hell yeah!)


texture set 1
base colour Emissive Normal
image image image
RoughOcclusionMeltal Opacity
image image

Texture set 2
Base colour Emissive Normal
image image image
RoughOcclusionMeltal Opacity Directional normal(hair)
image image image

total Tri count 99984
total Poly count 51242
wireframe and other info available in the marmoset viewer

thanks again for making this challenge for everyone managed to push myself up a few extra levels :heart:

progress work for.
Dracula 3000 A.D - Fairy Tales Challenge || Real-Time Game Character - FlippedNormals Challenges

4 Likes