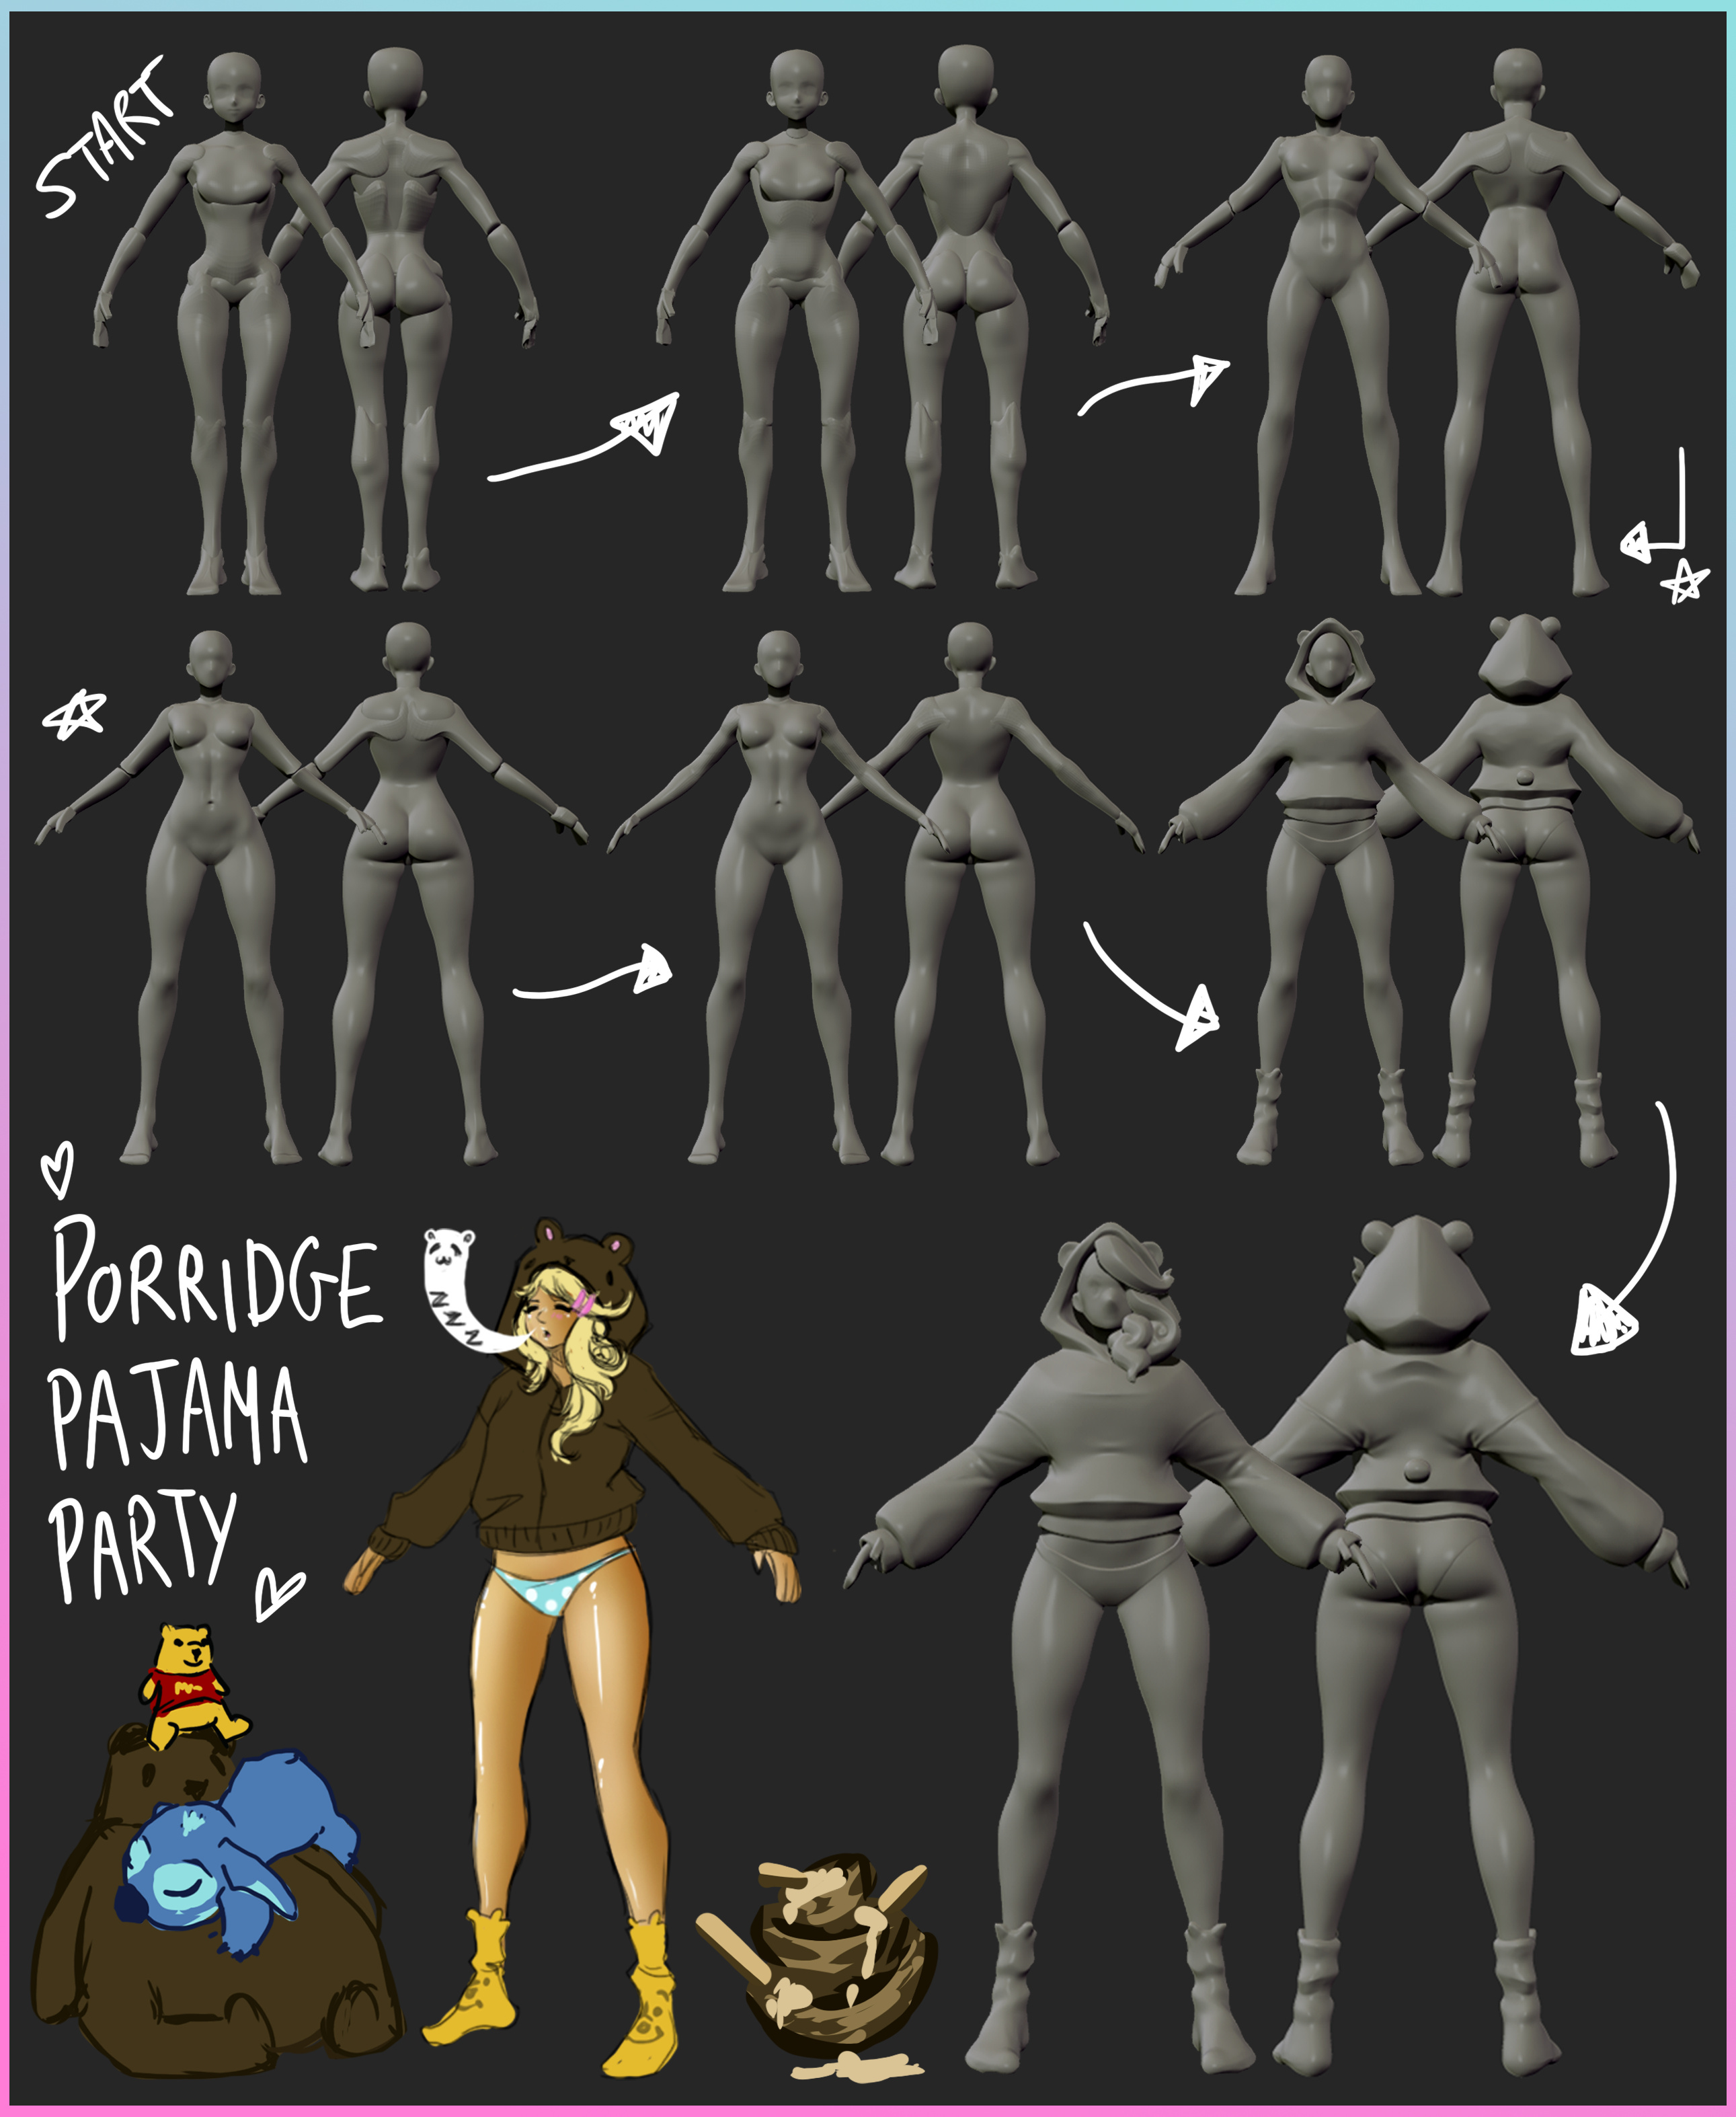
START
START
A current day take on the fairy tale Goldilocks and the Three Bears.
 DAY 1&2
This character is heavily inspired by my (and everyone else’s) current living style and my obsession with bears (see username).
I have 3 different size teddy bears in real life, and eat porridge enough to feel I had to do this. I want this to be a bright and colourful take one the tale. I want to have 3 chairs balanced on top of one another with the sized bears sat in them only just falling as bowls of porridge fall from their laps and Goldilocks balances on the very top eating a happy spoonful.
Please bear with me, I haven’t entered a challenge before and am not sure If I am doing this right haha!
1 Like
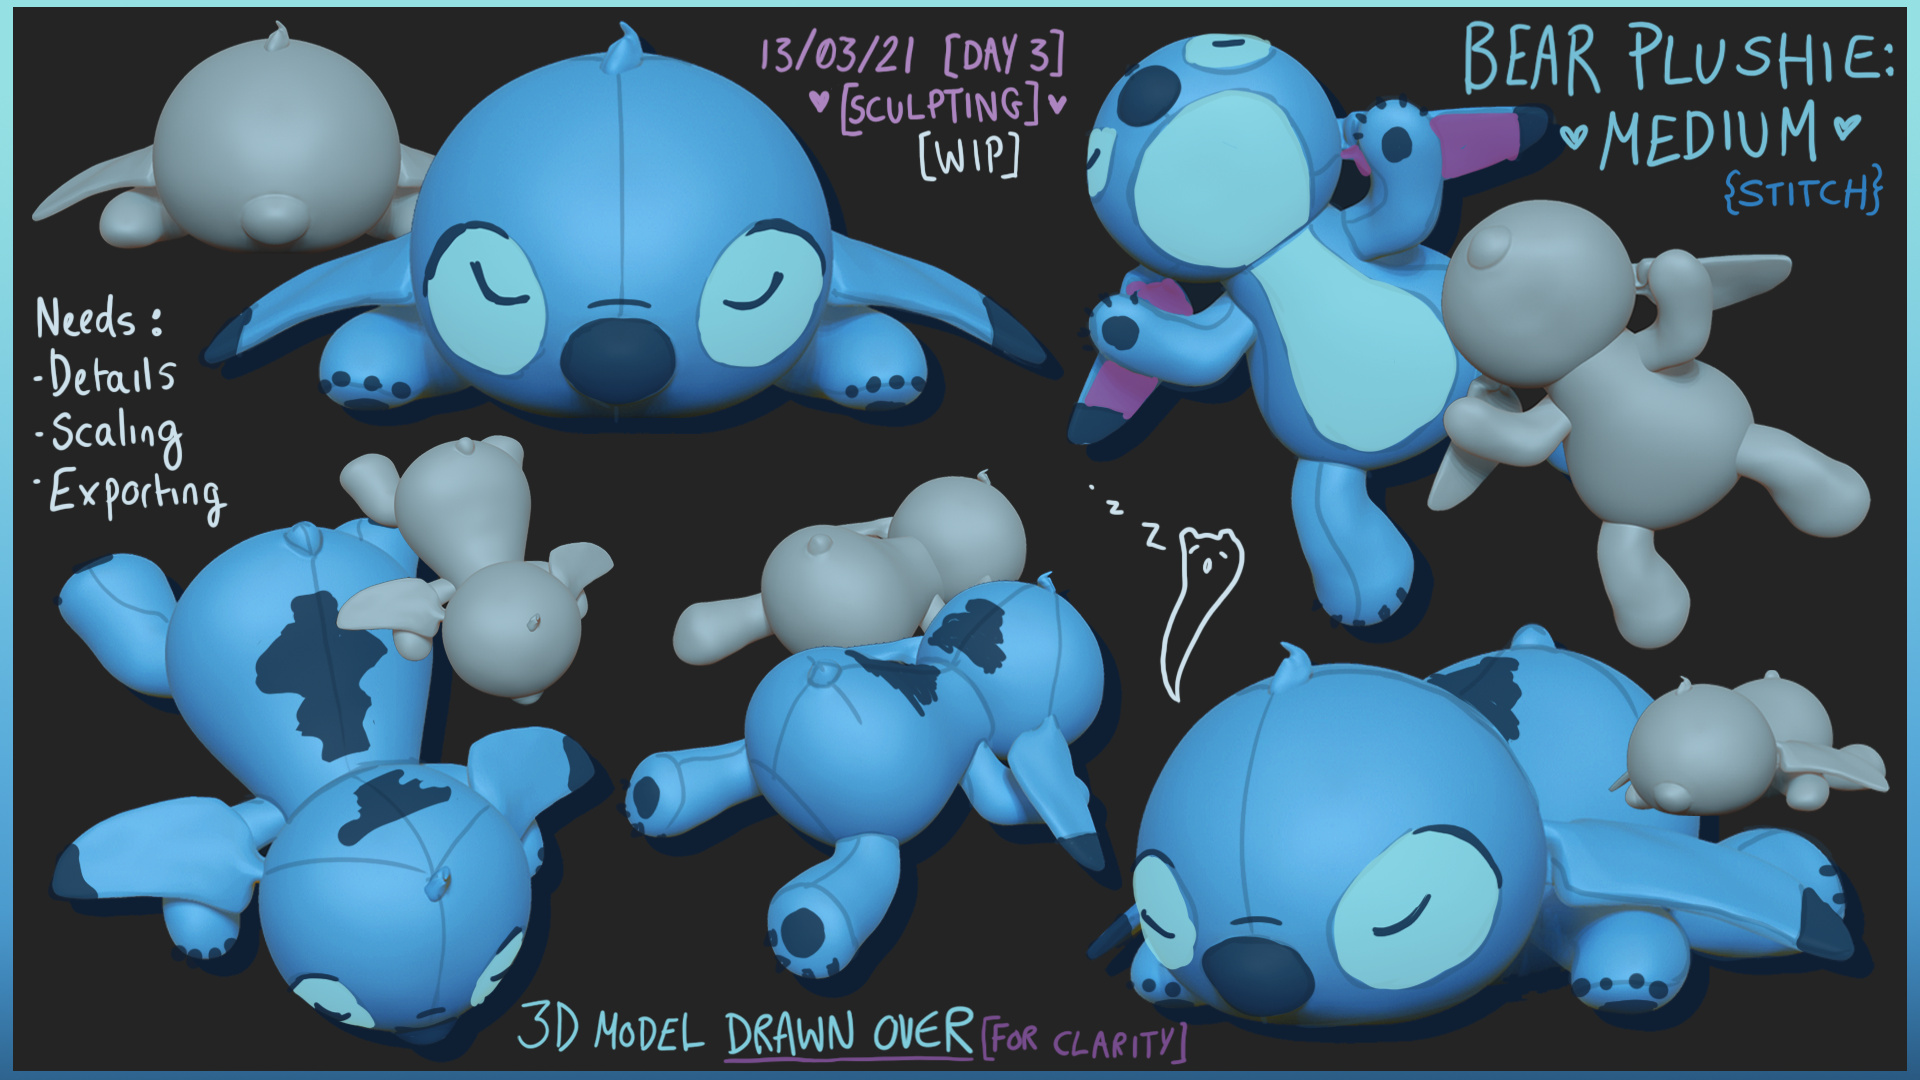
 DAY 3
DAY 3
(I don’t know if replying to my post is correct to continue the thread, please can someone let me know! I’m at a complete loss with blogging, thank you in advance ^_^/ )
So I’ve been working on the base model of the medium teddy bear (stitch) today. He is detail-less but I spent a good while getting the shapes right. He is indeed a teddy bear I own and love so I hope that shows through. The paint over is just a colour correction and paint on details so you can see what it will look like more accurately. Tomorrow I will either do Big bear teddy, Djungleskog or small bear teddy, Winnie the Pooh. If you’re wondering why I’m deviating slightly from brown bears for 2 of them, I want colour and personality, plus the concept fits it better anywho!
1 Like
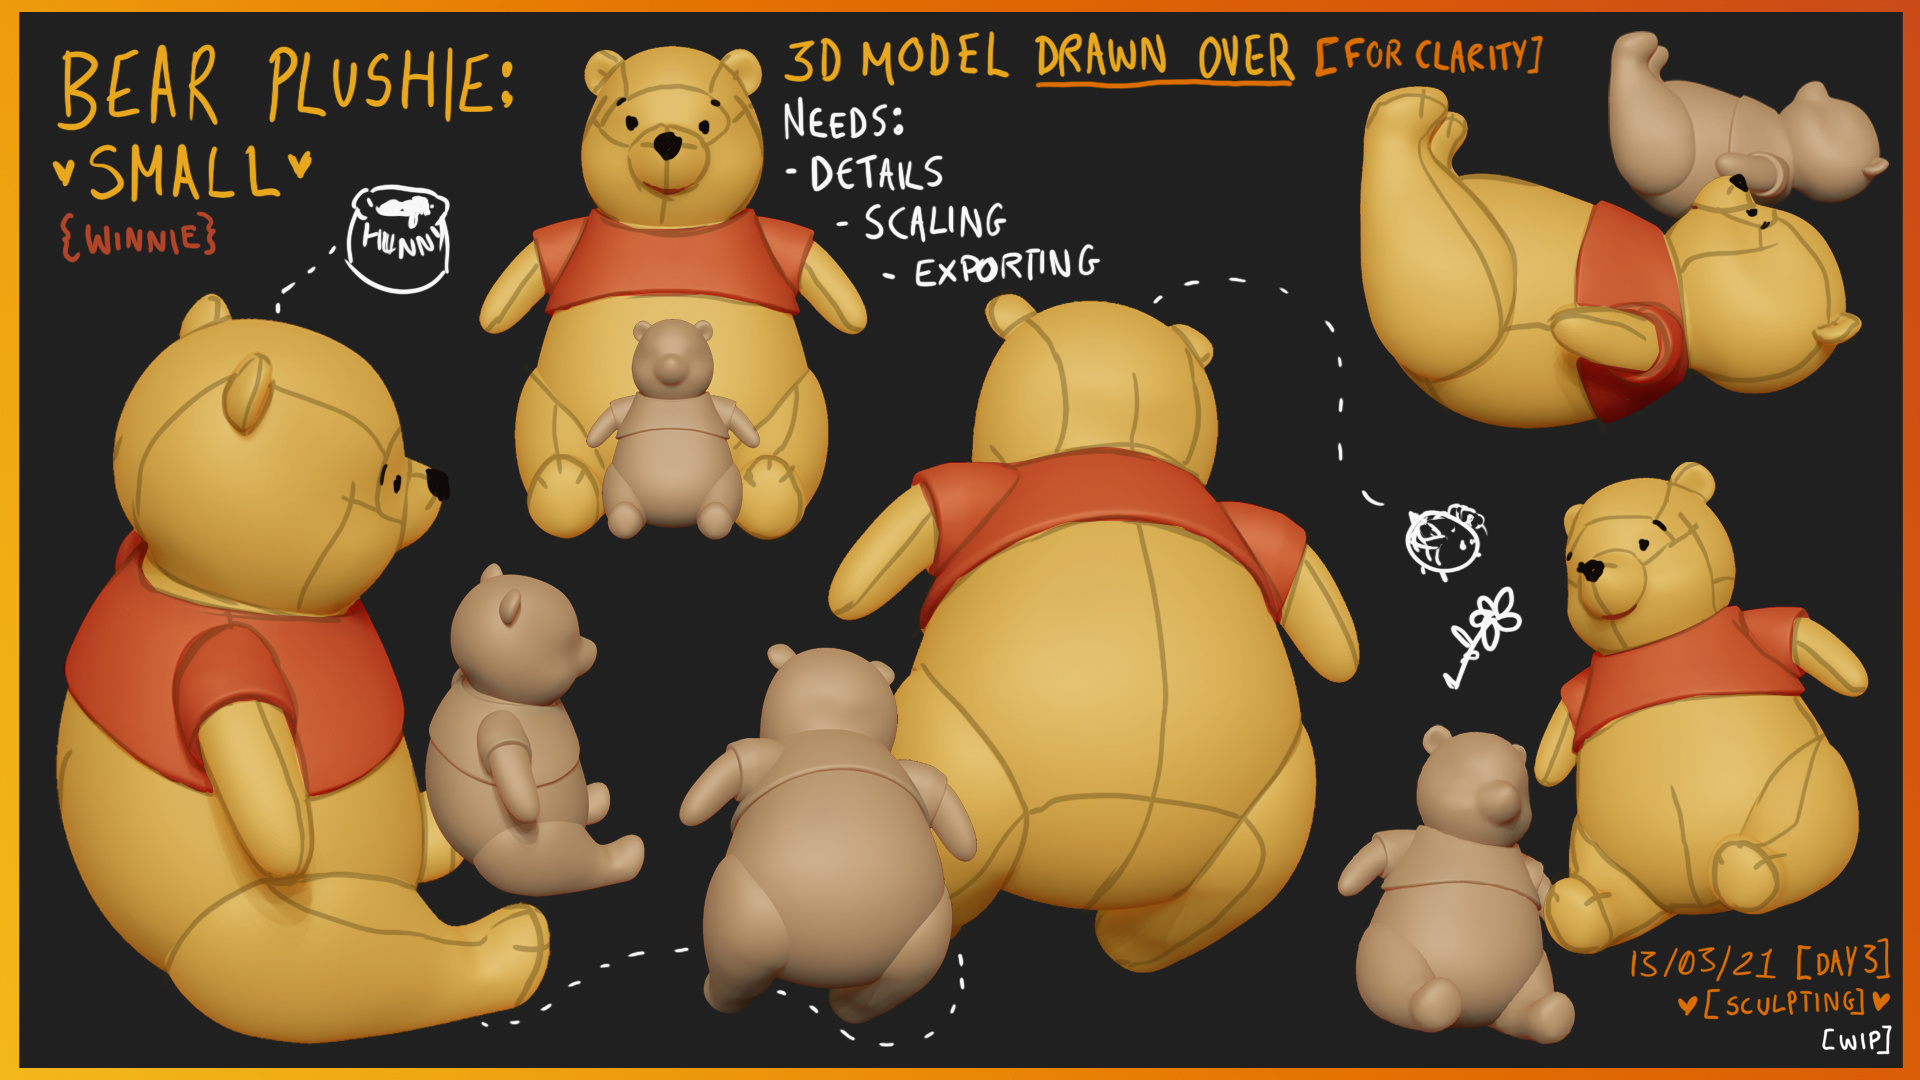
 DAY 3 EXTENDED!
So I got excited and decided to do smol Winnie also tonight! I did the base shapes really quickly as he could sit on my desk easily. What doing the paint over presentations has showed me is that if I model in the seams for the bears, then I can use those to unwrap along and its hidden really cleanly! It also is a great guide for unwrapping since its quite literally the translation IRL. I love unwrapping models and now I’m even more excited to try that out 
I will model Djungleskog tomorrow and if I have time, also the chairs!
1 Like
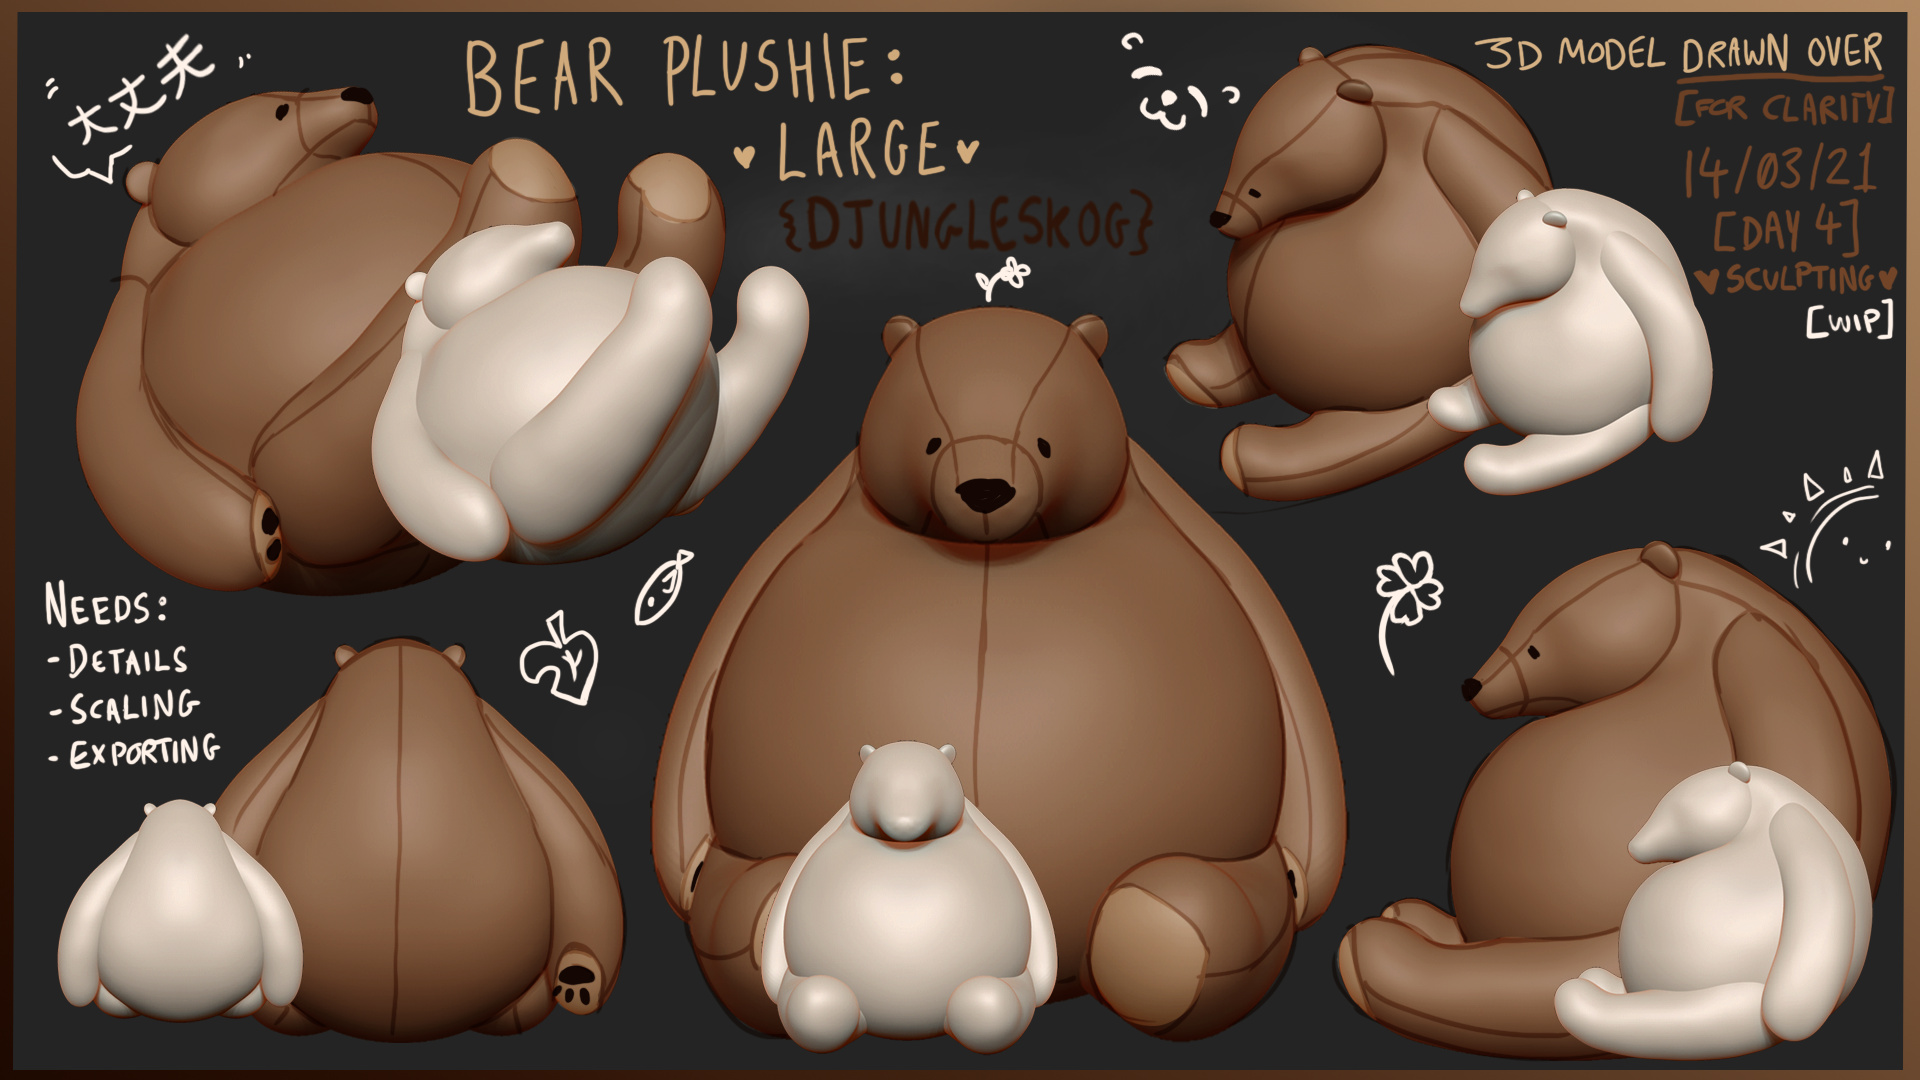
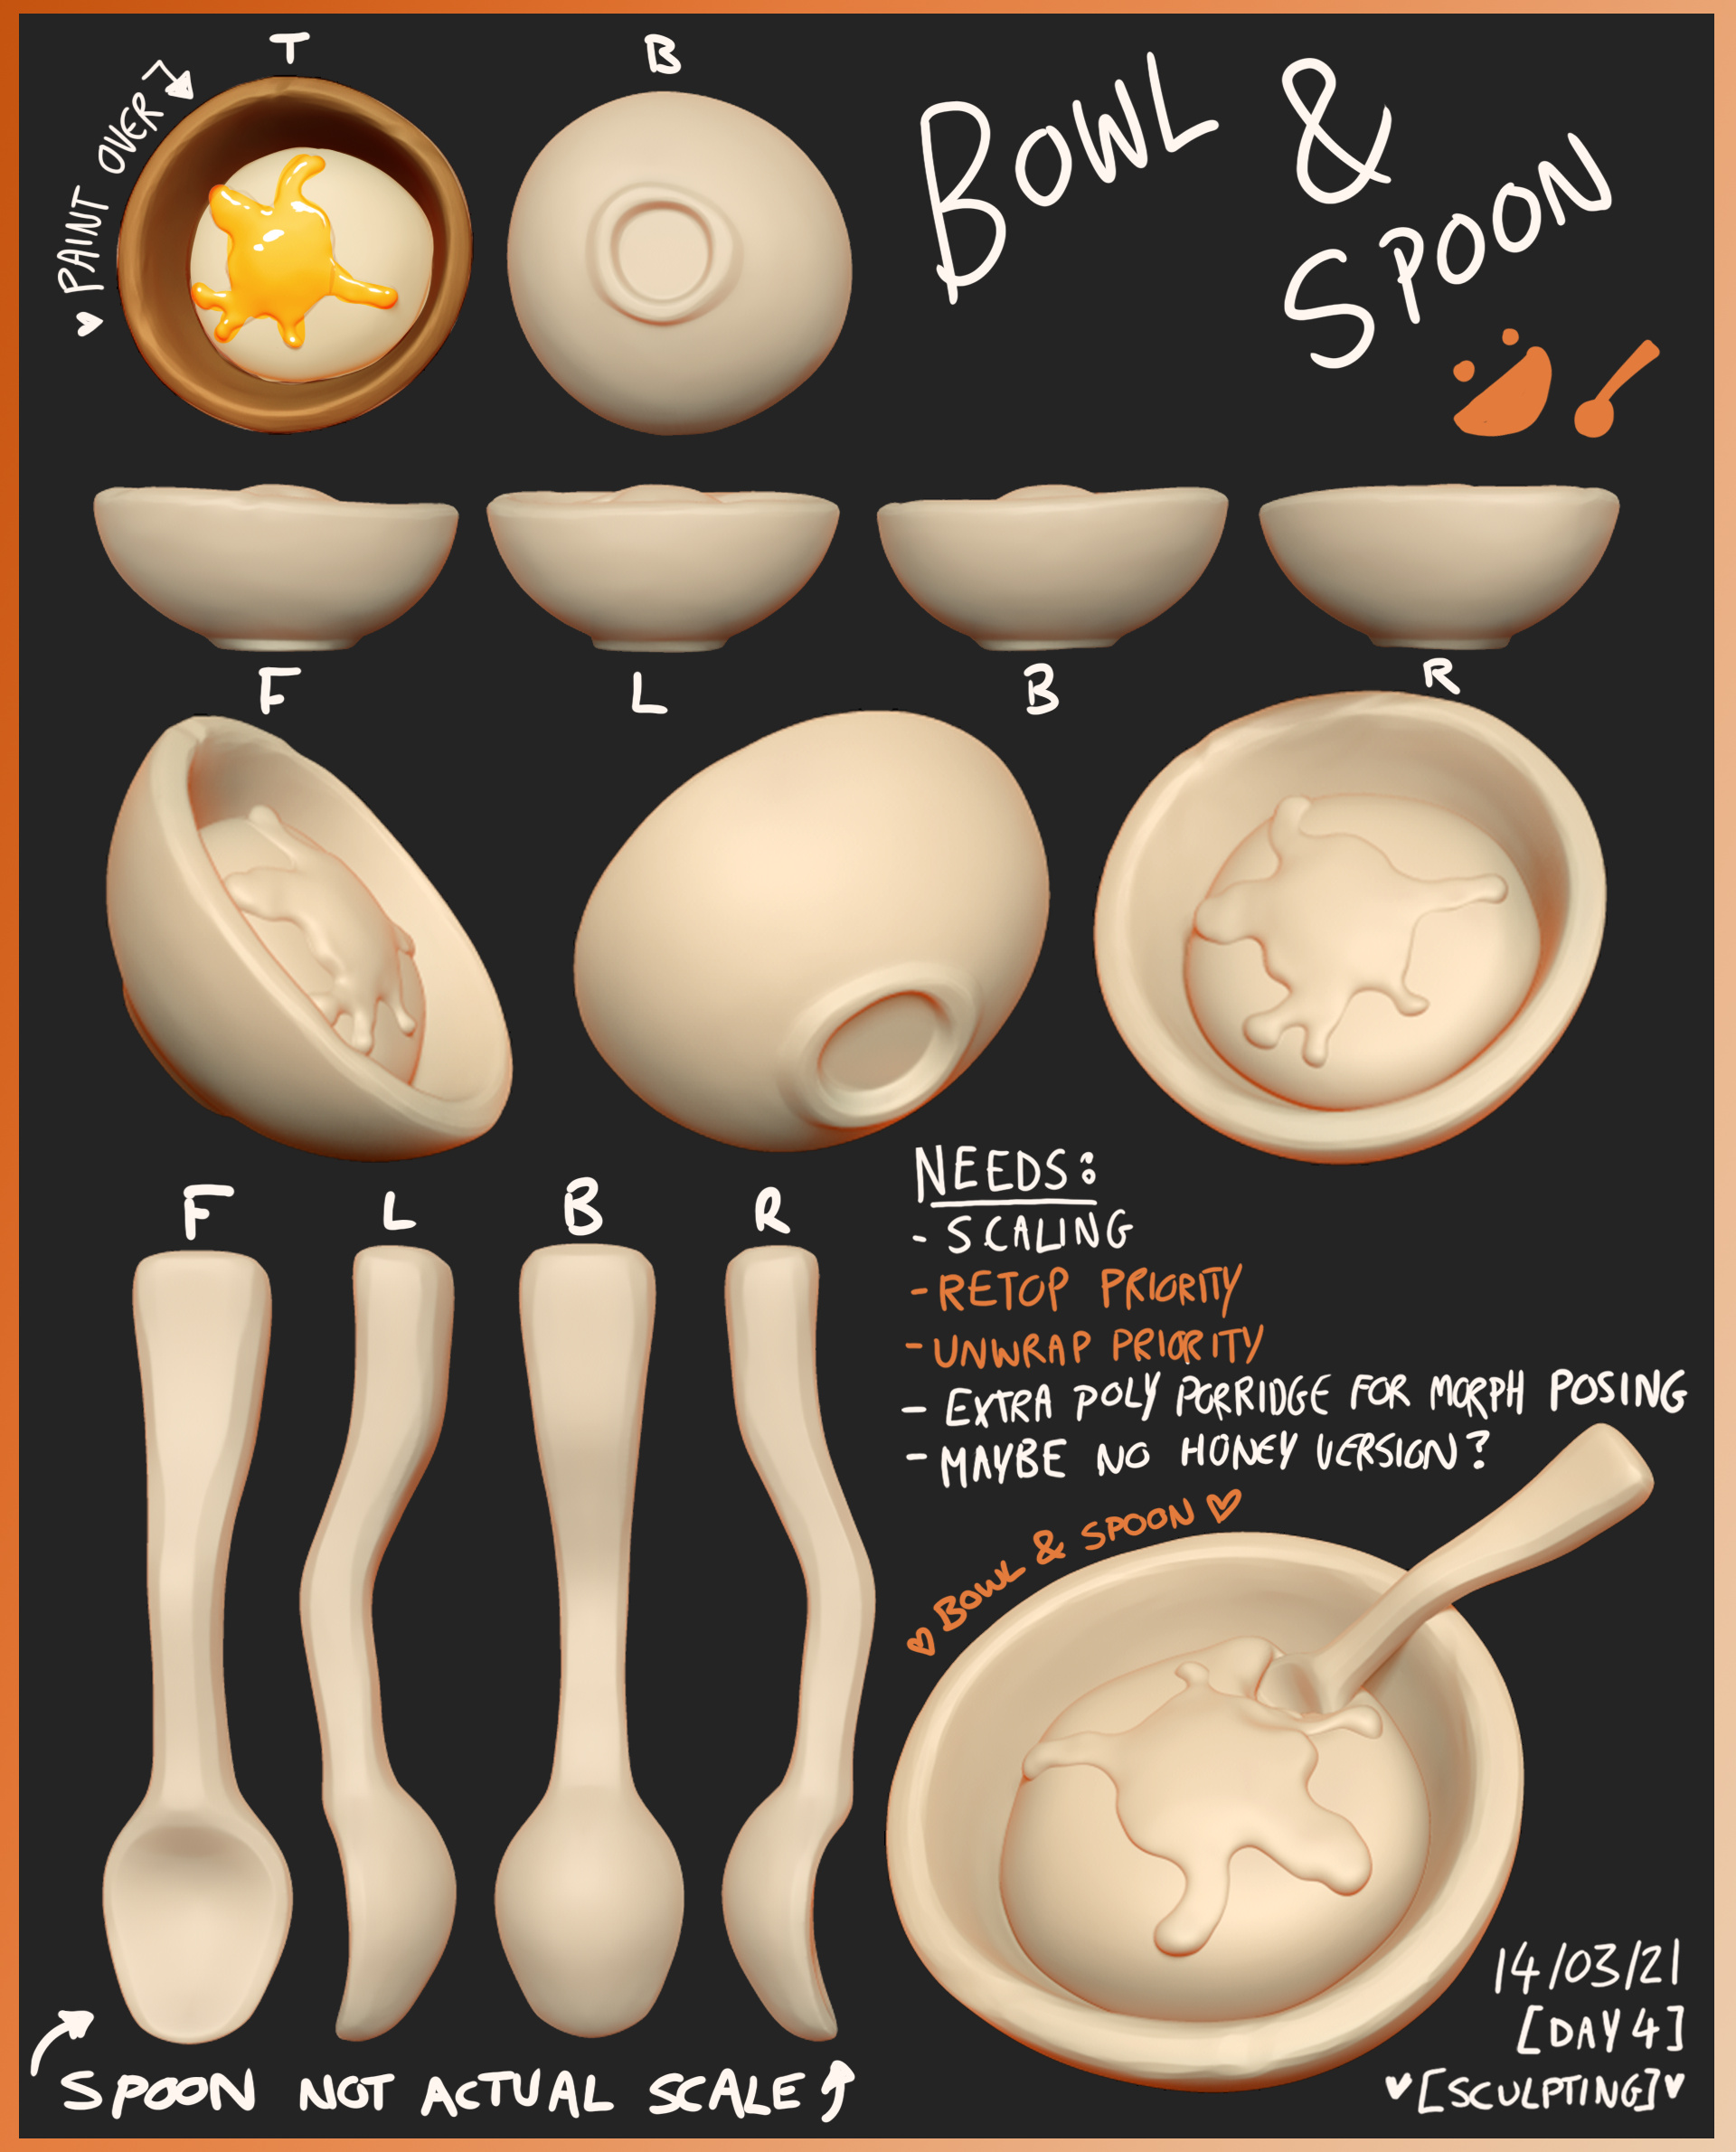
 DAY 4
DAY 4
Here is the 3rd and final bear base model done! I have been real busy today in the brain department so I’m not doing as much today for the project as I had wanted, so I am going to make the bowls and spoons instead of the chairs as I think that is more approachable right now haha. I have found doing these sheets extremely helpful??? Its broken down the details clearly for me so when I go back to detail them It remains clean and accurate! (It has also made that more approachable too). I’m a major perfectionist and I really need things like this to keep me going with a project. The moment something isn’t organised my brain implodes and I have to break that wall to continue. Heres to hoping and trying to make sure that doesn’t happen haha! Tomorrow I will do 1 chair to breach that barrier of entry and I will scale all the models inside 3ds Max and re-export them to Zbrush to scale them there to do final sculpt model to scale later more cleanly.
OH! Also edit note: I need to move the arms and legs away from the body enough to make rigging easier! When sculpting I knew I forgot to change that after getting the shapes right.
1 Like
 DAY 4 EXTENDED!
So like promised yesterday, I have done the bowl and spoon. This doesn’t really need much more work sculpt wise as I don’t want to over detail one of the less important and small objects with noise for a concept so clean and bright. Props like this aren’t exactly as fun as bears ect. but it needs to be done for the overall idea to read nicely!
Is there an edit limit to me changing thumbnails? I can see that it shows up as a number count however I don’t know if its advised haha
1 Like
This is starting to look really good! and yes, replying to your posts continues the thread so this is great for the judges to keep track
1 Like
 Thanks a bunch! Also that is slightly relieving information as I was just copying how other people were doing there’s without fully knowing haha!
It’s all good. as long as you post your final submission on the final submissions page along with a link to this thread then everything will be good for the judges.
1 Like
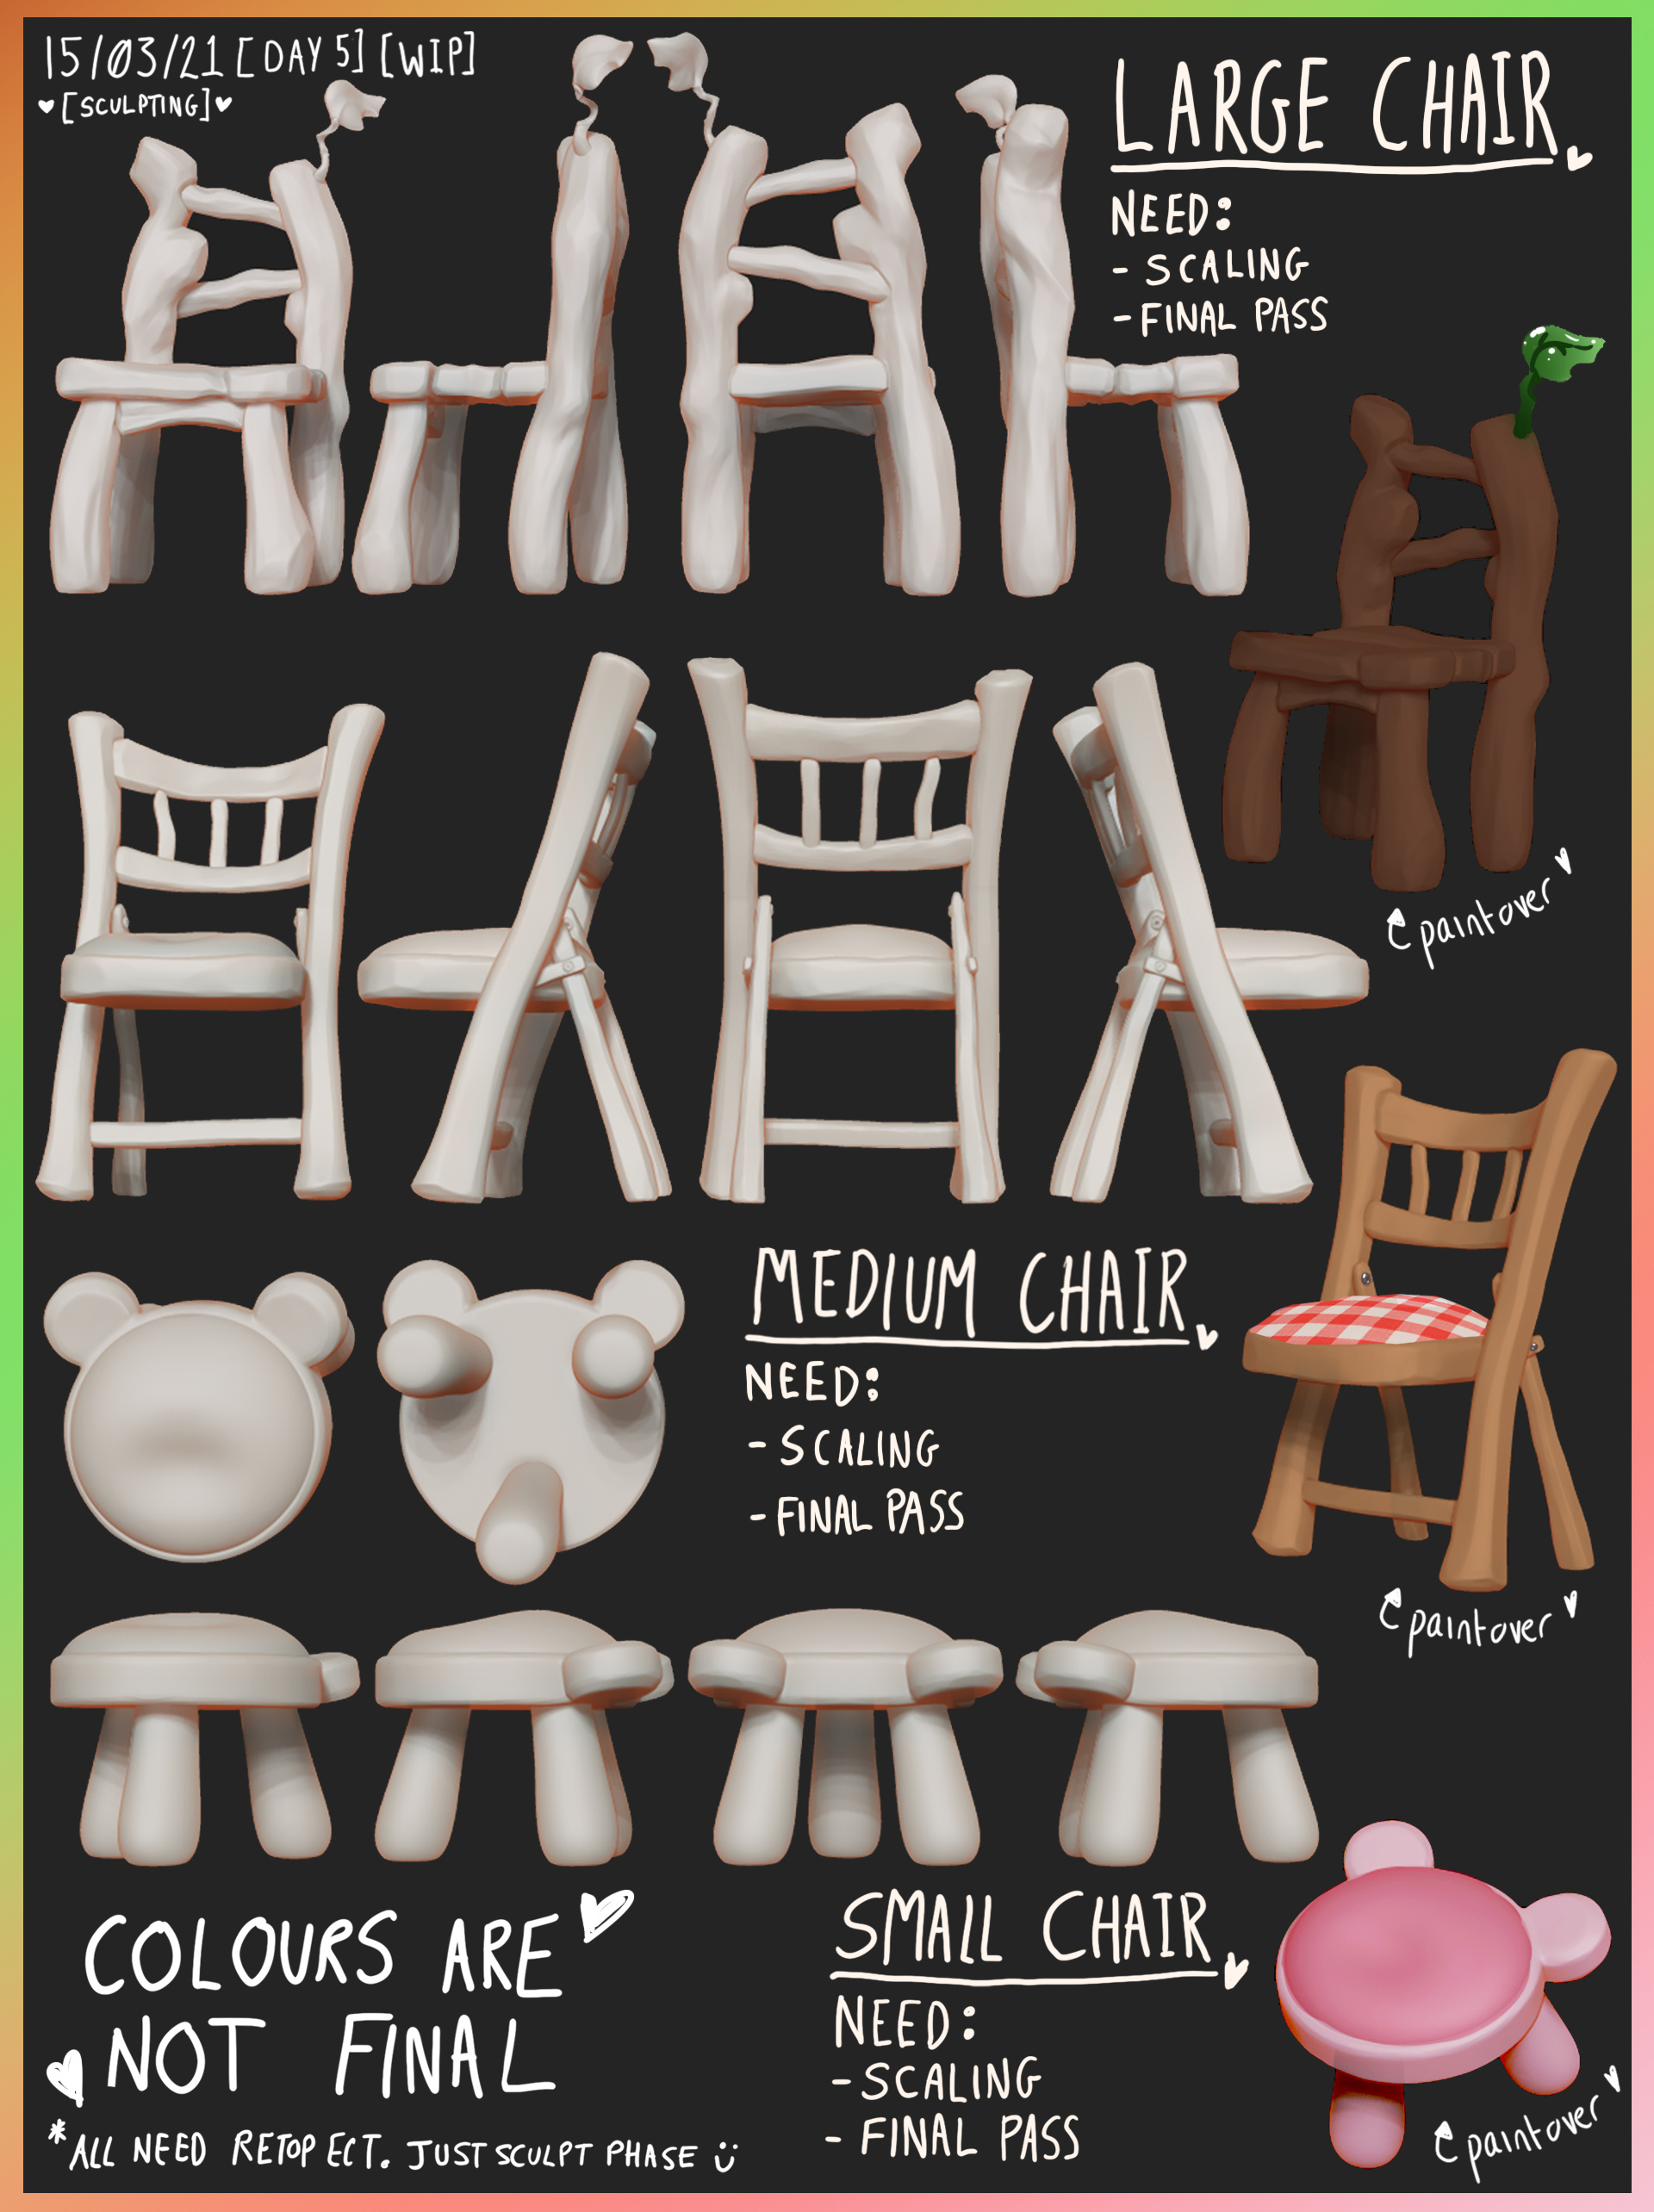
 DAY 5
DAY 5 
Managed to do all 3 chair sculpts today. Tomorrow will act as an admin day and a face sculpt day. I have got into the habit of not sculpting the face till the body has been put in to a certain degree because I find if I get frustrated with the detailing of the face it will put me off. Plus it involves a decapitation to get that first few dynamesh and zremeshes that isnt spread over the whole character.
Slowly but surely I hope you can see the concept come together. I didn’t want to waste time illustrating it if Its just me working on this and its so clear in my head. I am getting a new PC in about a month so I hope to do everything not involving substance painter before then haha. My current laptop struggles a LOT with substance painter and its worrysome so heres to hoping it works out!
2 Likes
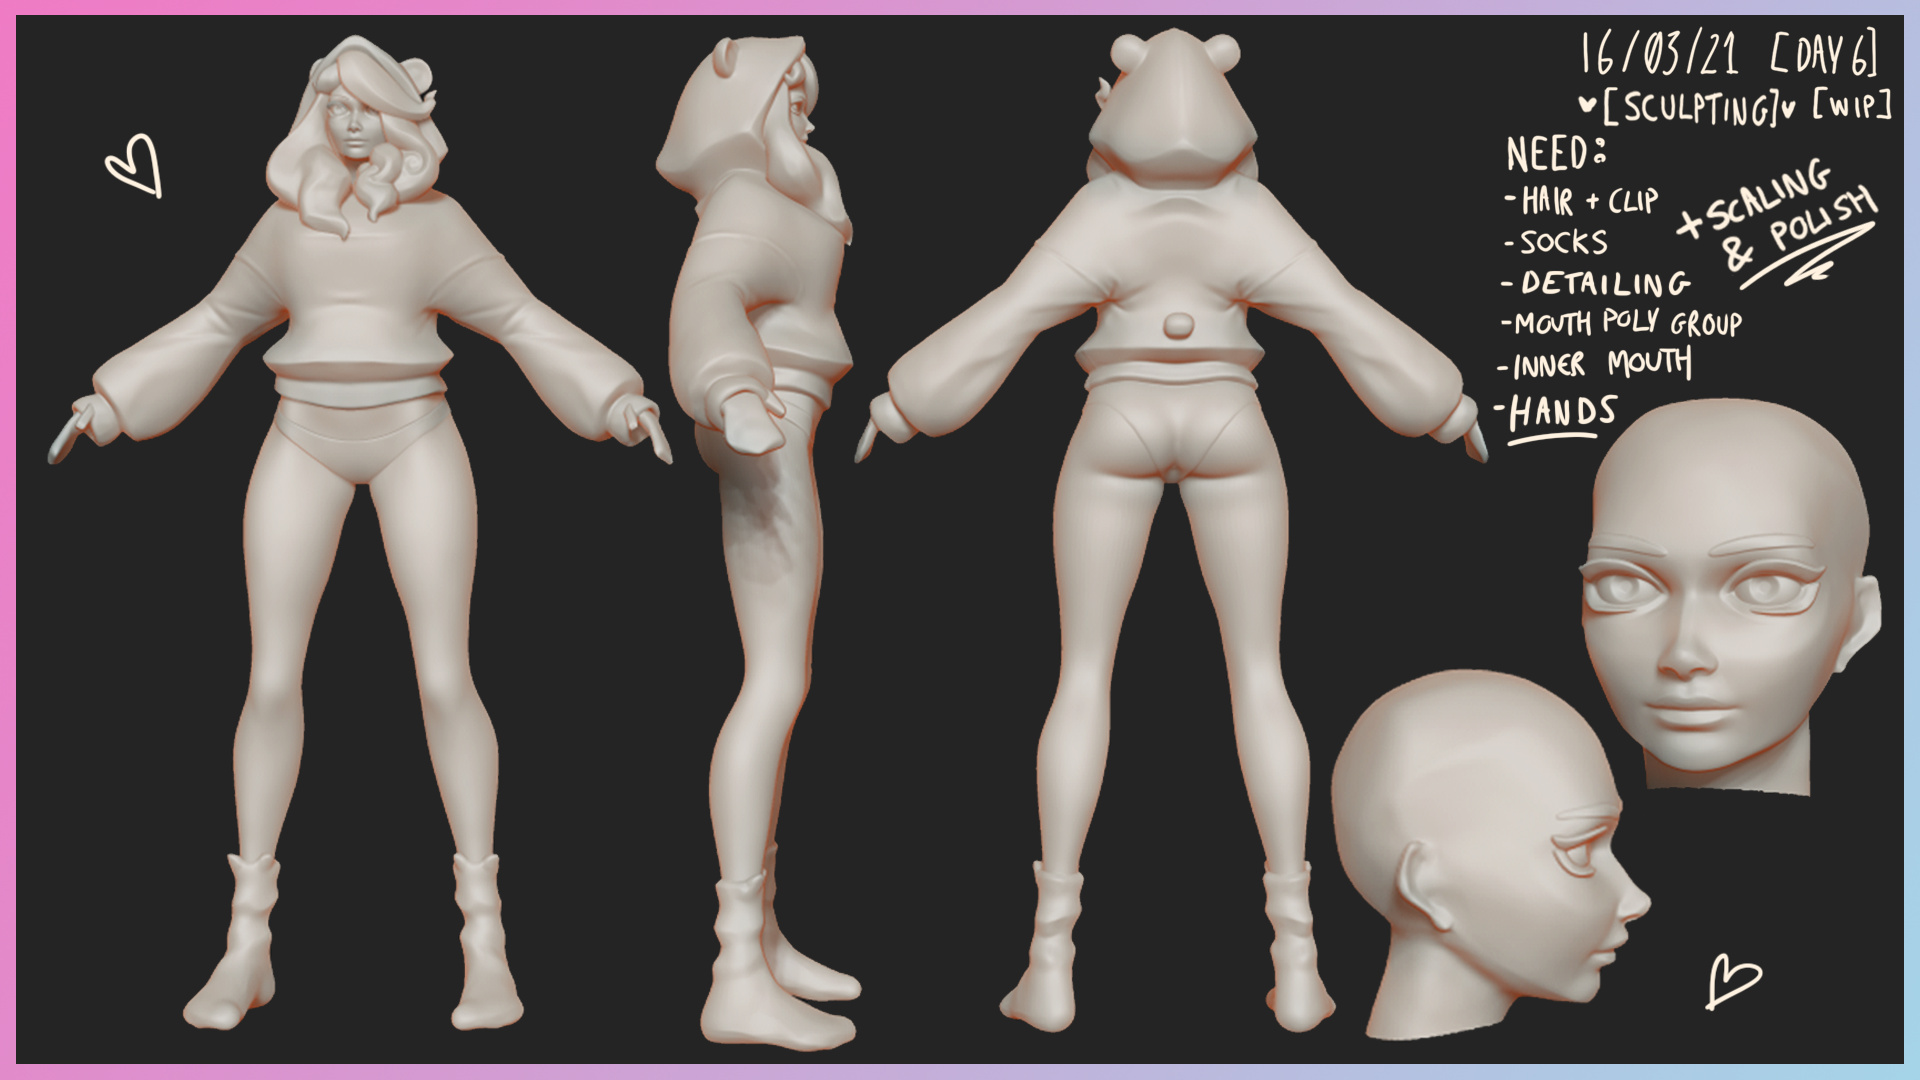
 DAY 6
DAY 6
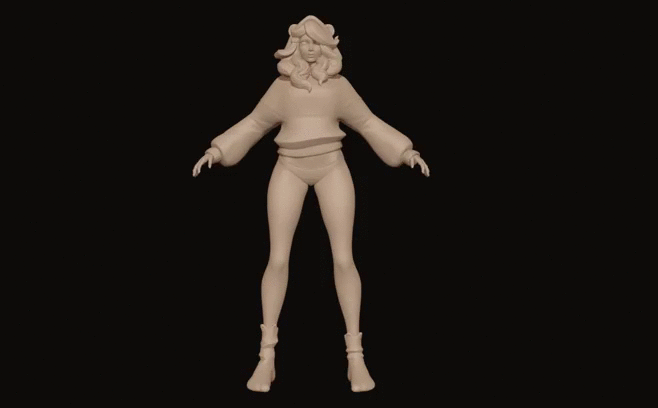
I am real tired today so I didn’t do much apart from work on the face and head. It’s been a while since doing a face and I really struggled to get the person in my head out in 3D. I still need to open the mouth and place the inside of mouth, do hands ect. so still room to change. I want the sculpts done asap since I need to plan ahead for the future where I can’t do as much work on this!
Oh I did do a bunch of organising of files also which always makes me feel good haha! Once I’ve scaled everything I’ll do a bunch of subtool renaming ect. I’ll probably scale everything either tomorrow or the next day
3 Likes
i like how soft and cute everything is
even tho it has stylish sharp edges
1 Like
Thank you! I’m real glad because thats the vibe I was going for!
1 Like
well you nailed it down very well
1 Like
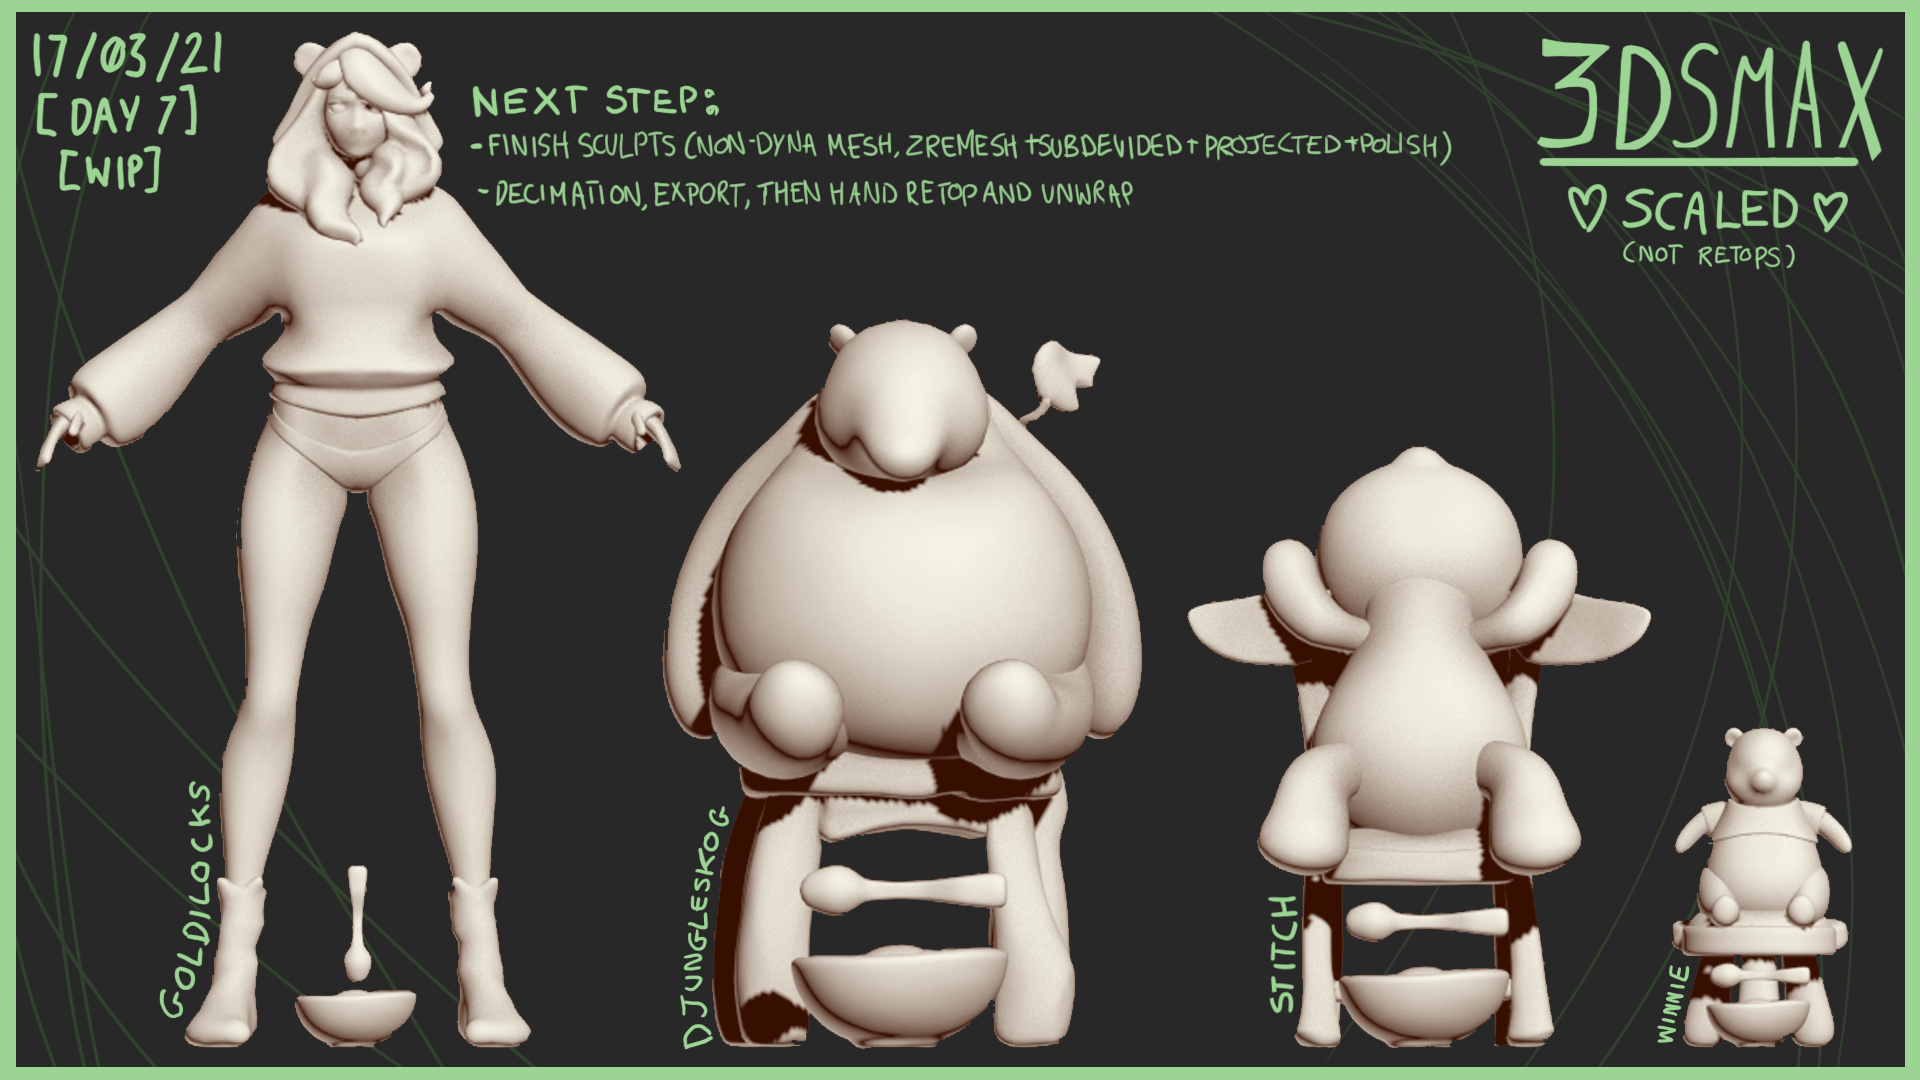
DAY 7
Sorted all the bits and bobs out today to an extent. Basically when I say “scaling” I mean an export/import from Zbrush to 3dsmax and back so that baking will be perfectly clean and everything is to an in engine real life scale. I noticed if I do this later in the process it causes problems so it is very important I did it now before the end of the sculpt phase. Didn’t get as much as I’d hoped done other than that but I have had major issues with my laptop today. Luckily my new PC is coming tomorrow which is a surprise and I’ll probably be spending a long time setting that up so unlikely to do anything tomorrow! I’ve never owned a desktop before so it’s very exciting!
I had worked more on the face and head (opening the mouth, adding inner mouth and transferring it to divisions, polishing the other half of hair) however my laptop crashed as I was trying to get a picture of it so cannot show that right now haha! Thanks for the support so far ^_^/
1 Like
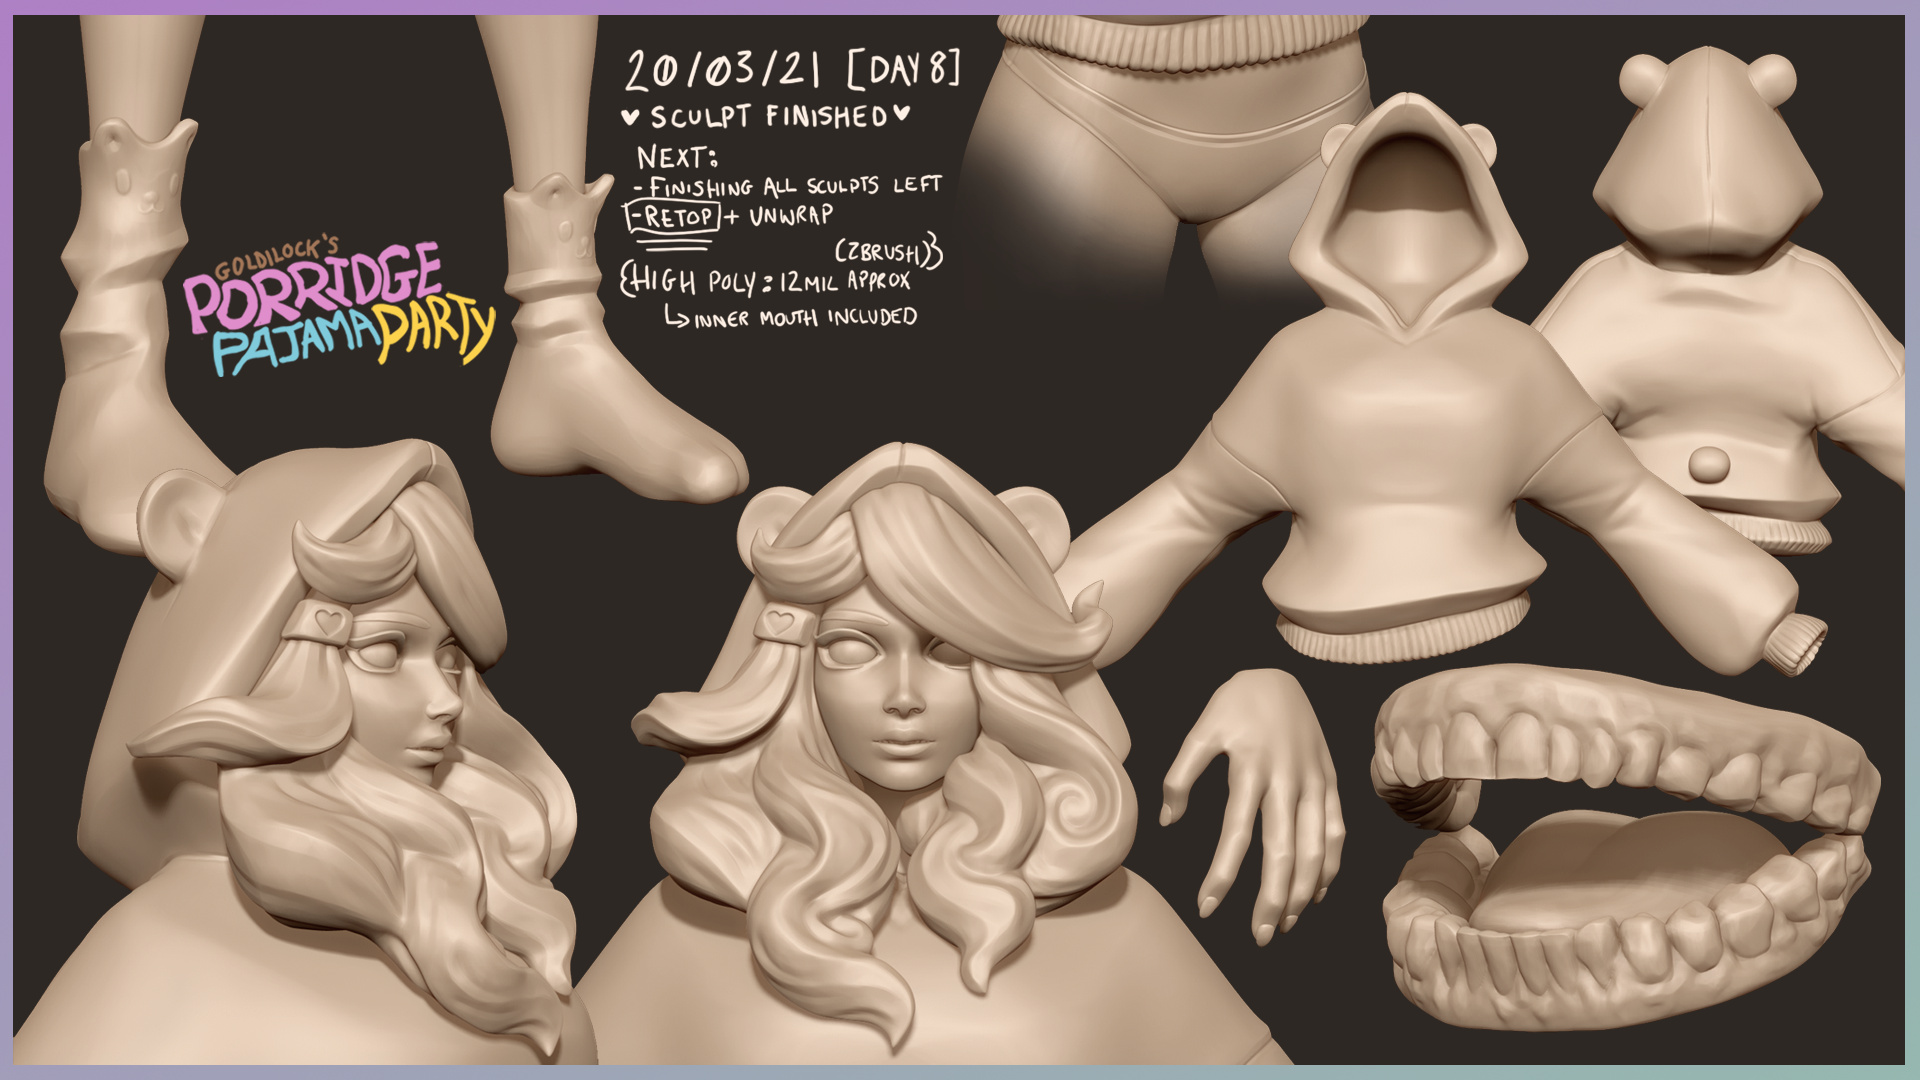
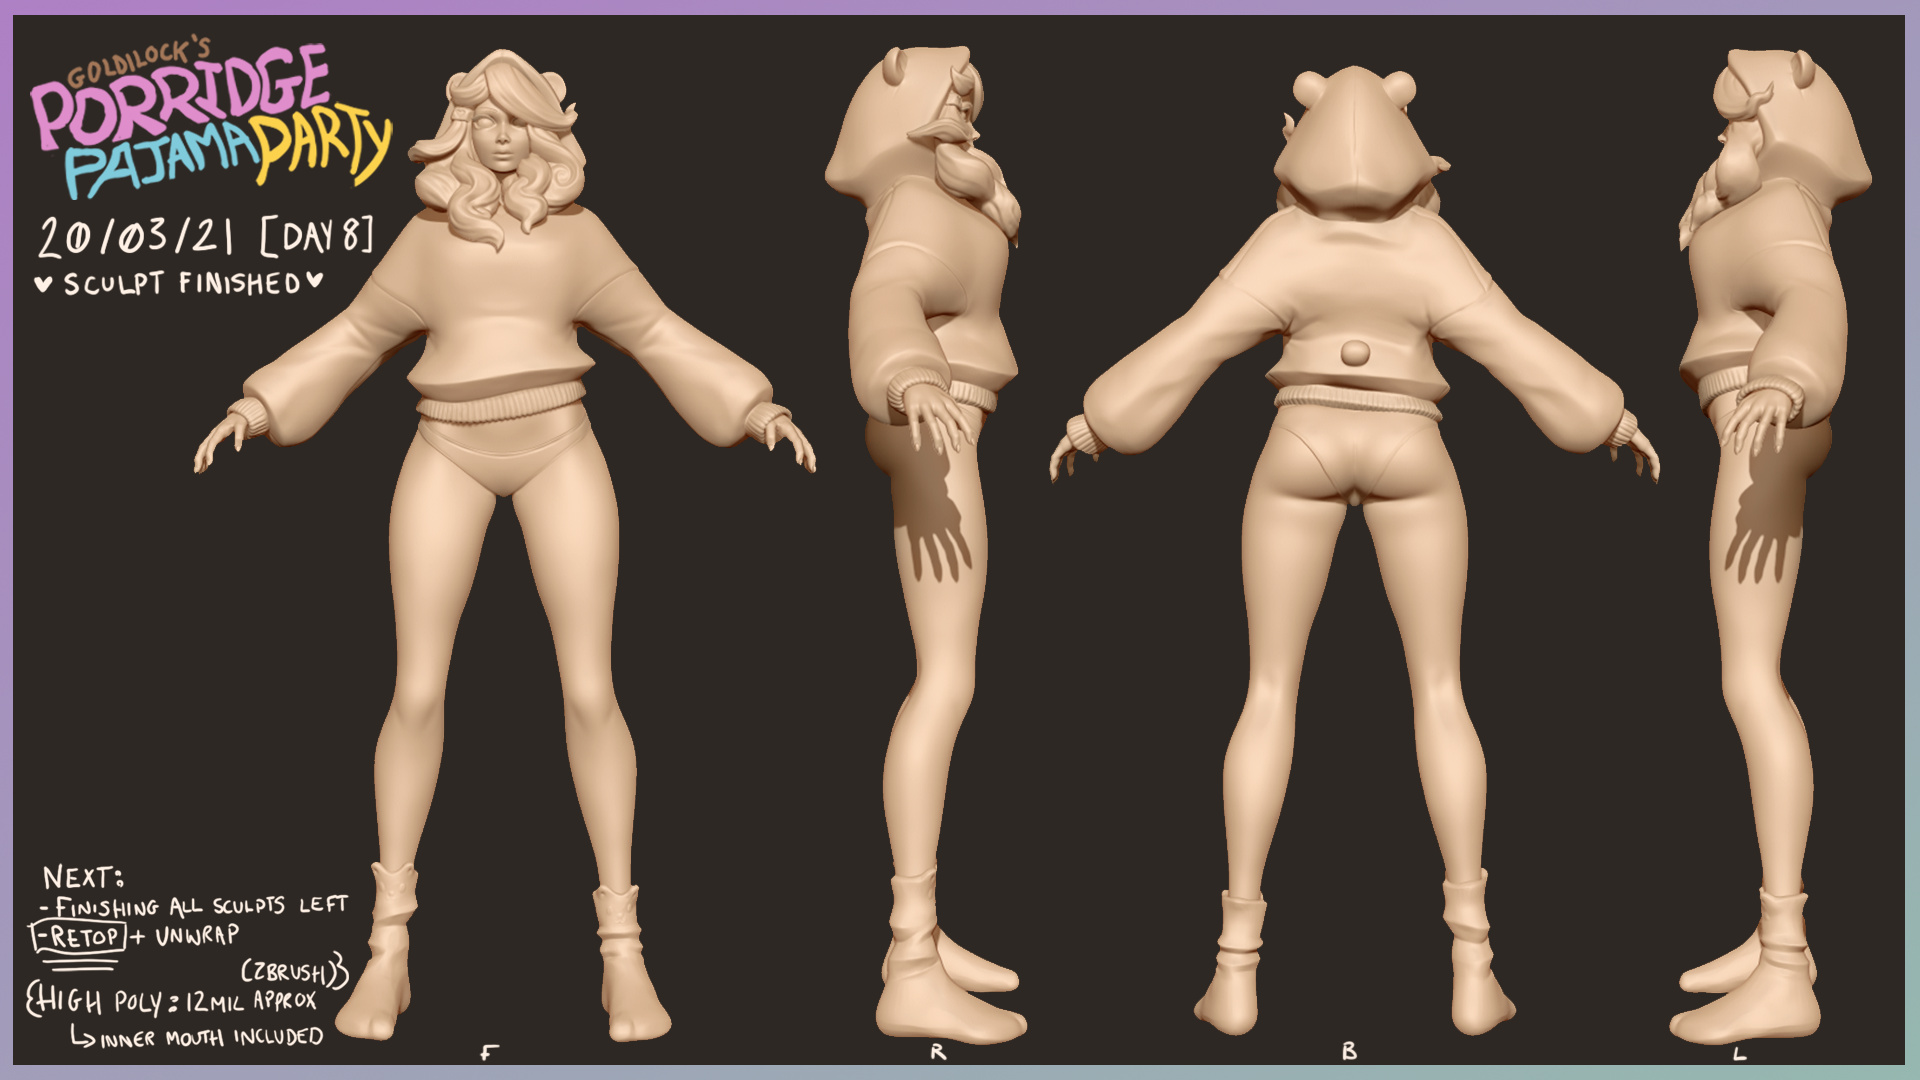
 DAY 8
DAY 8
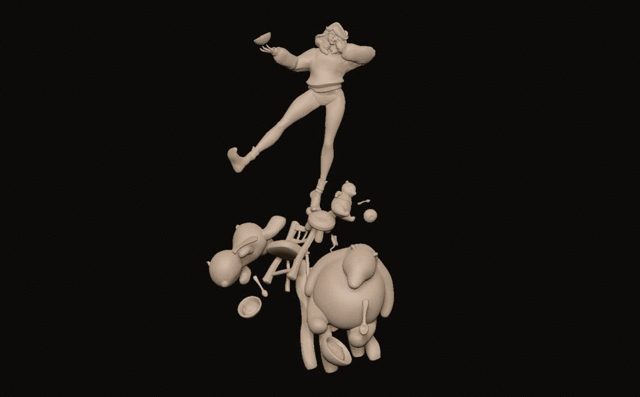
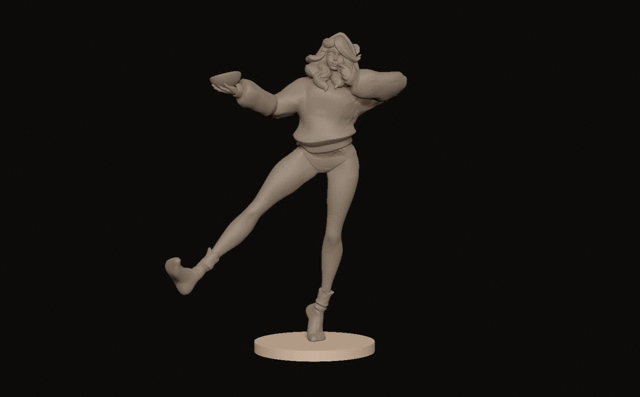
SO. I have a new PC! It runs like a dream and I can now model without stress. So the past couple days I have finished off main girl’s sculpt and tomorrow will do all 3 teddy bear boi’s and If I can, also the chairs ect. After that I can officially say the sculpting phase is done and focus solely on retop ect. I prefer to work 1,2,3,4,5 ect. rather then a bit of back and forth (although that is inevitable occasionally throughout baking).
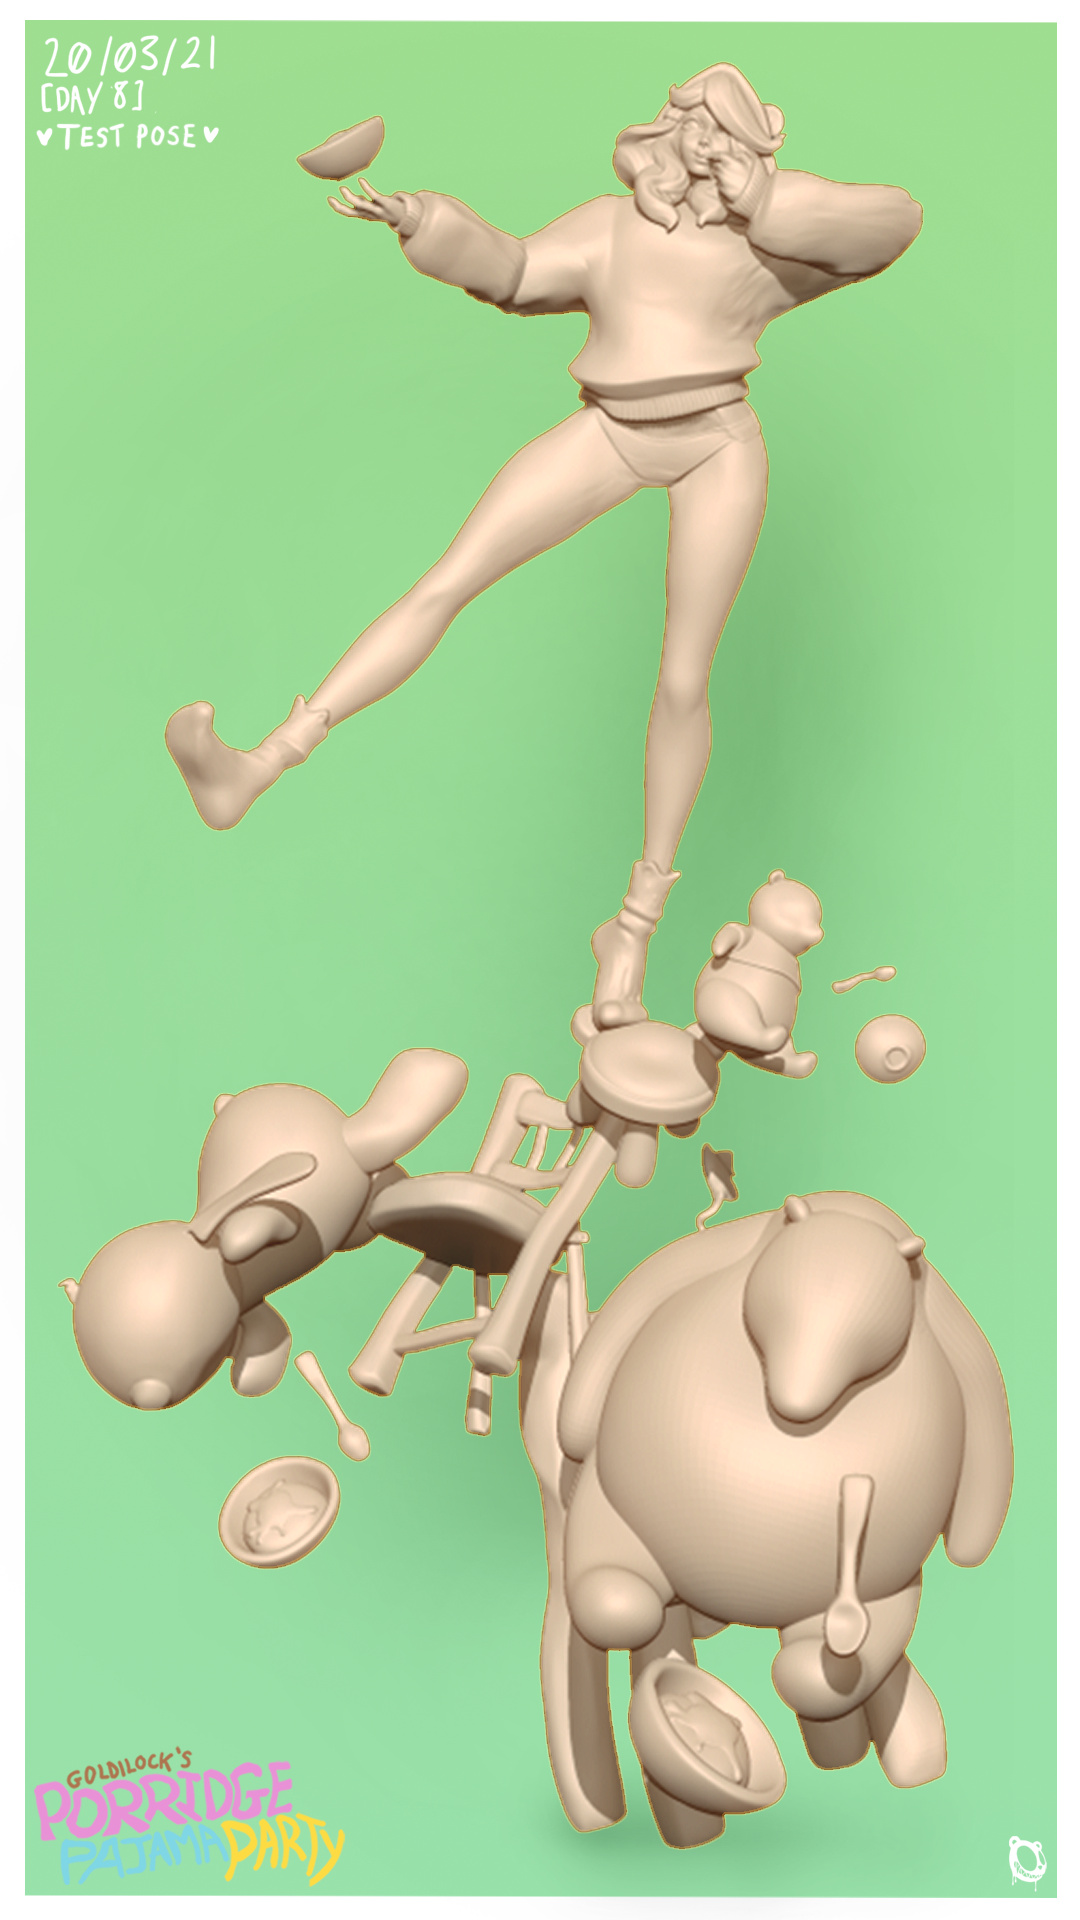
The high poly came to about 12 million polys, so I decimated down to 1% for a 200,000 poly model to retop from. I then decided to test out my idea in my head because why the hell not and I love it, I can’t wait to see it fully coloured and life like rather then a dodgey quick move tool pose in Zbrush haha. I wanted a bright and clean poster like render ^_^/
I’m going to try add 360 vids here: (hopefully it works?)
5 Likes
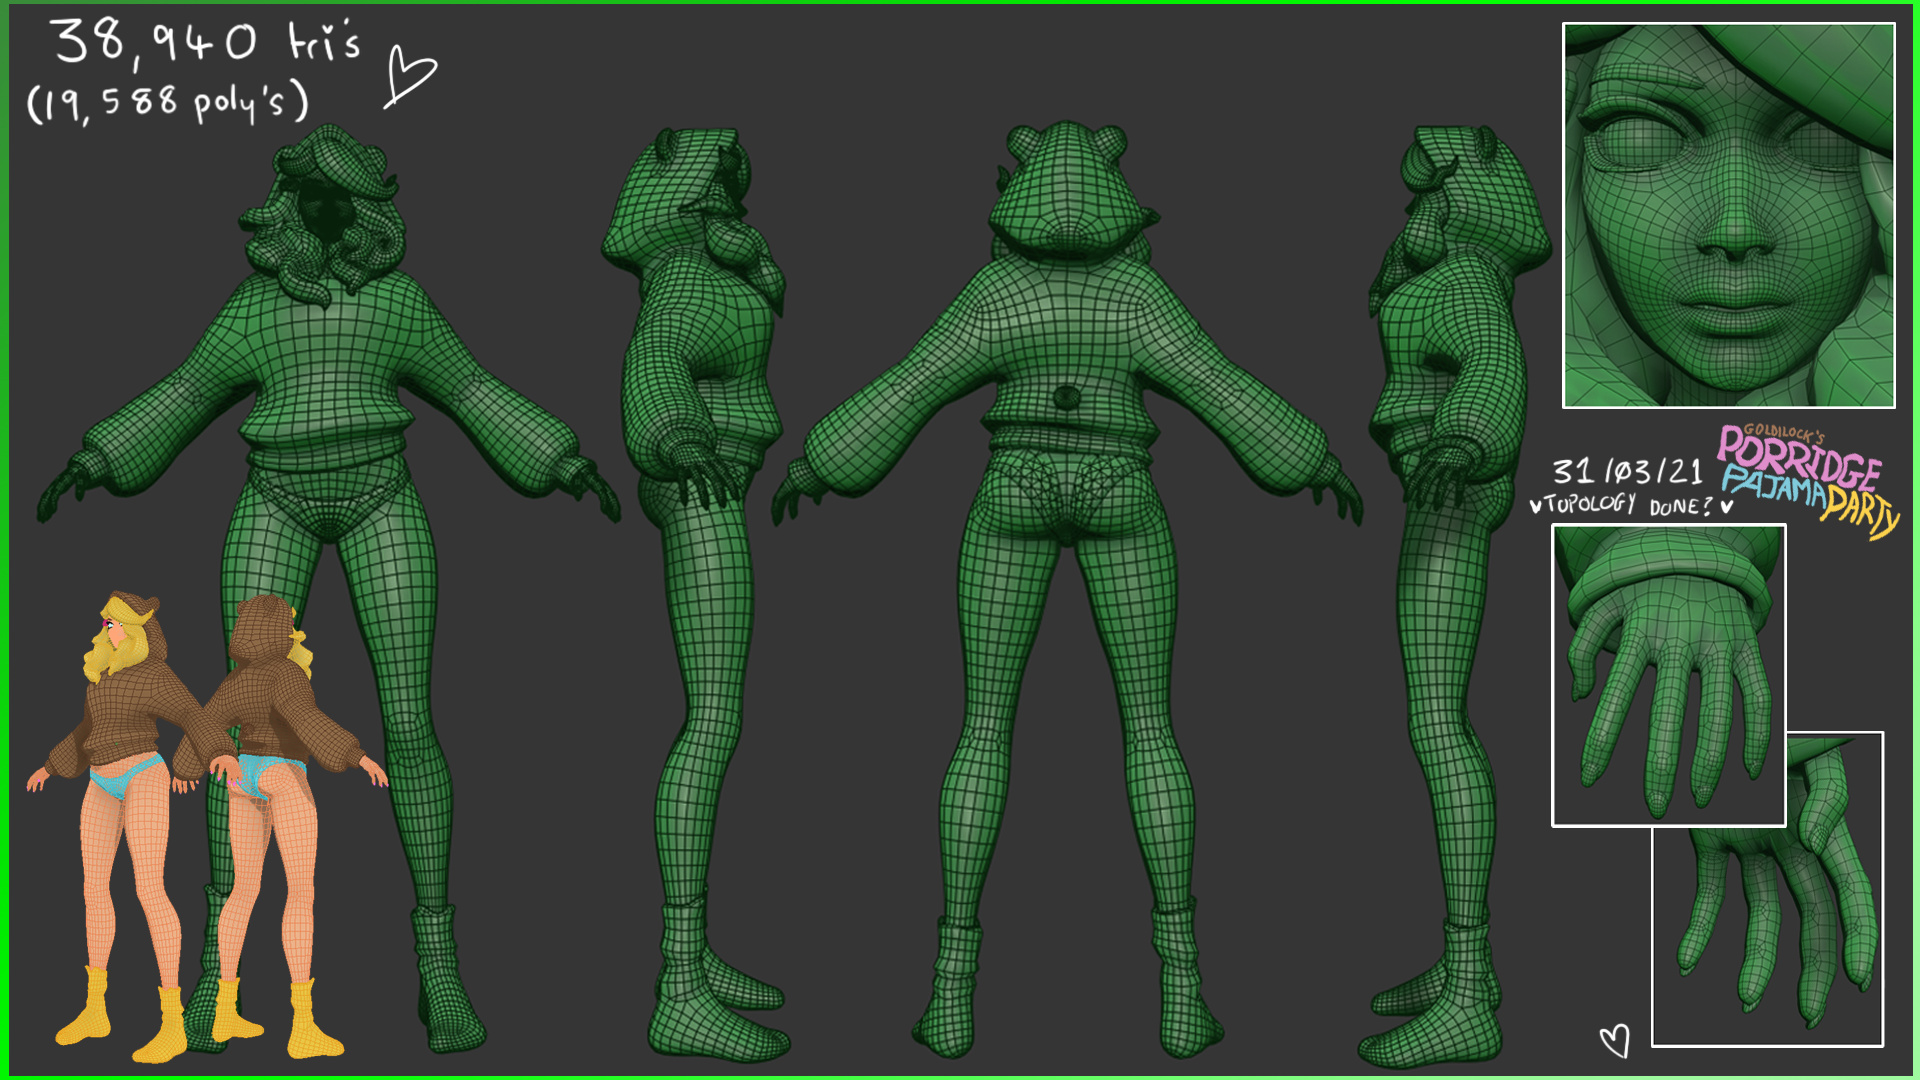
DAY 9 to 15
Long time no see, this past week was ROUGH. I got ill for a few days then when I got better, started retopping, which I found really difficult this time. It has been well over 9 months since my last time doing retop for a character character so I was basically trying to fight against my cripplingly high expectations of myself and when things didn’t go right the first time, I got obsessed with fixing it and didn’t manage my time well, thus making more mistakes out of tiredness. I re-did the hand 3 times from scratch and the head twice, socks twice, upper leg twice and upper sleeves twice. Just because I was so unhappy with my faults. Theres numerous things I still hate but cannot keep fiddling with. The same goes for my unwrap. I spent 4 hours trying to sort the nose warping out and ultimately gave up as I noticed I did the topology slightly wrong and I believe thats why it cannot be unwrapped perfectly.
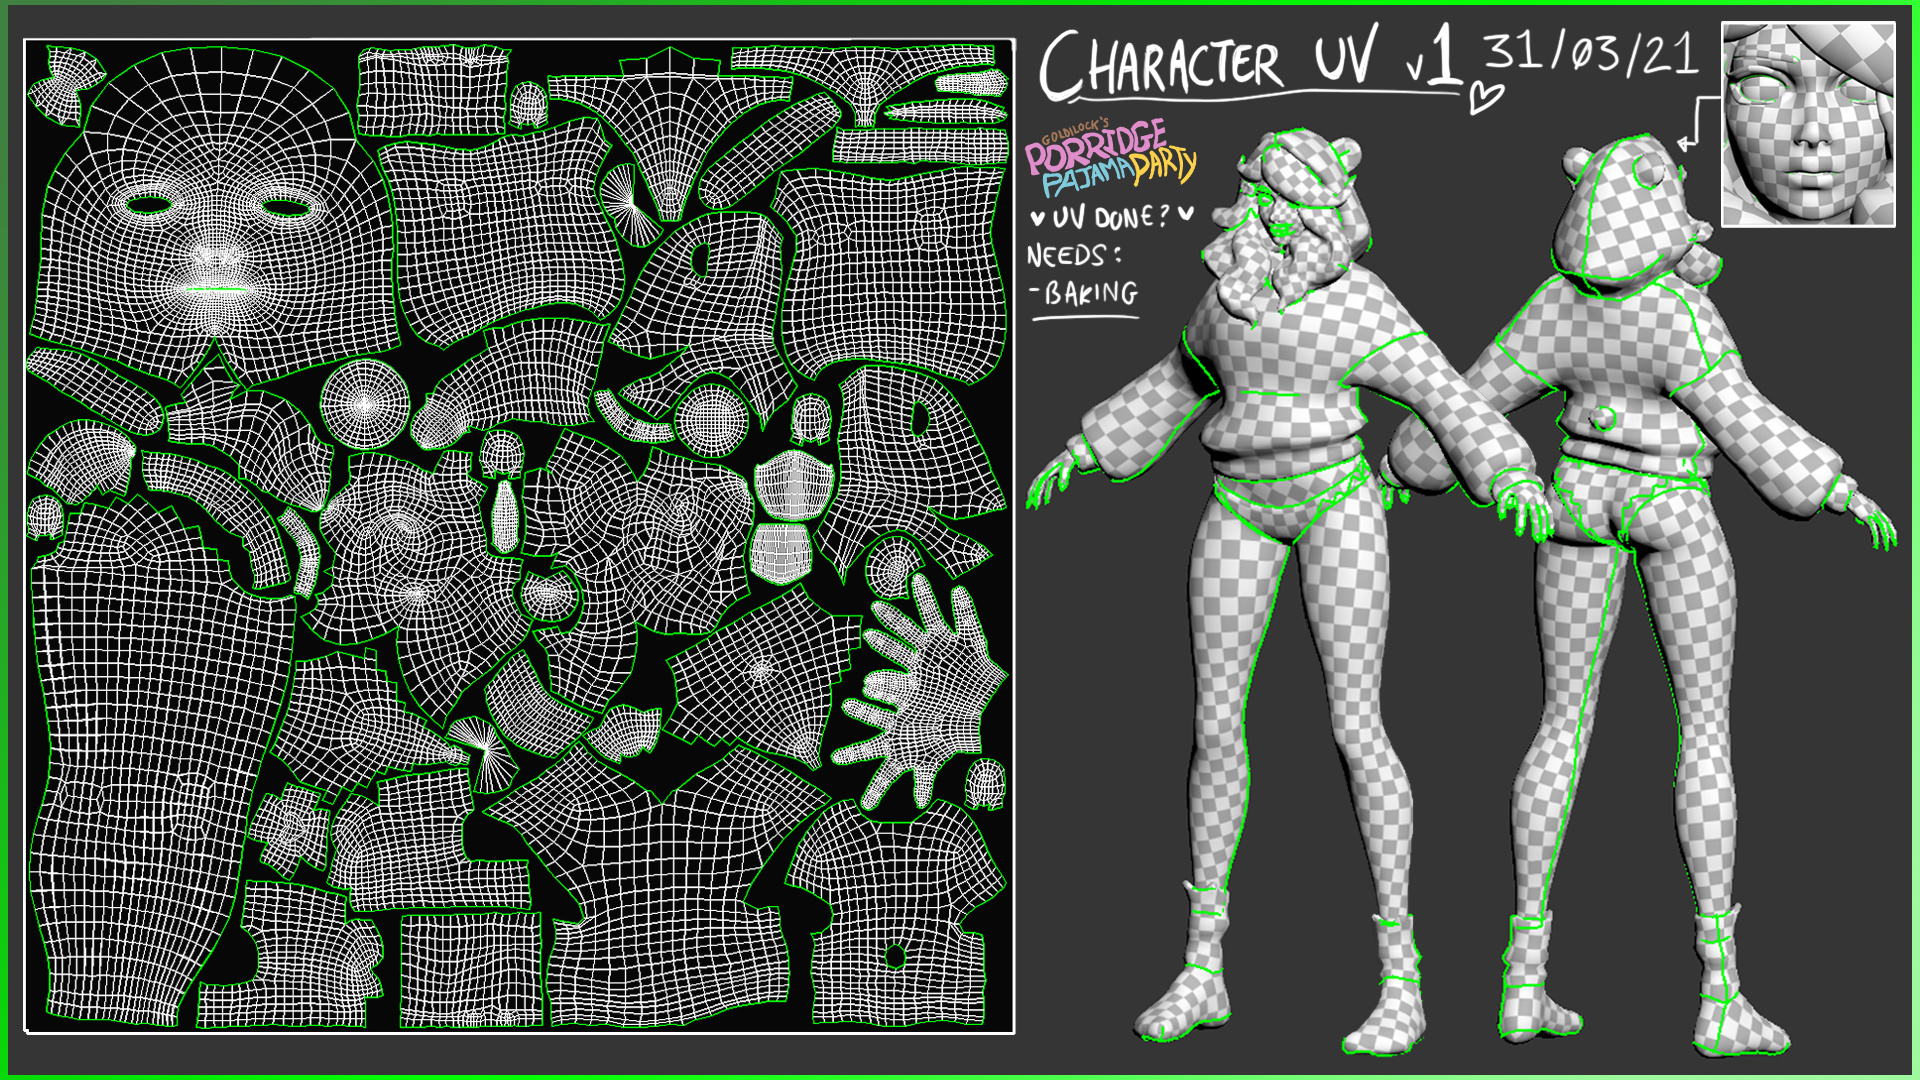
In my heart of hearts, I believe that me noticing I had fucked up, just means my next character is not only going to be quicker but better quality, and I should let this be as it is so I don’t let my perfectionism take over. These are not final as I usually fix alot when trying out the bakes. I WOULD try out a custom cage for baking however I dont want to be spending time I dont have as I still need to live life normally and should try harder to relax more from now on. In a way, however harsh it may sound, I feel I understand why I haven’t had much luck in getting a job, even despite not having a PC to do characters before this point I feel I’ve lacked specific detailed “you should do topo this like this instead” feedback and confidence in my work and this might be the perfect opportunity to gain that. So please let me know if I can do things easier, or better, I would greatly appreciate it and its infinitely helpful, especially if it matches what I think is wrong with it as it re-affirms me. Side note: I’ve actively chosen to put it all on 1 UV sheet, just as an experiment to see how distribution of detail is for 4K as I’ve only used 2x 2K texture sheets before for characters and thought it would be educational to know the comparison.
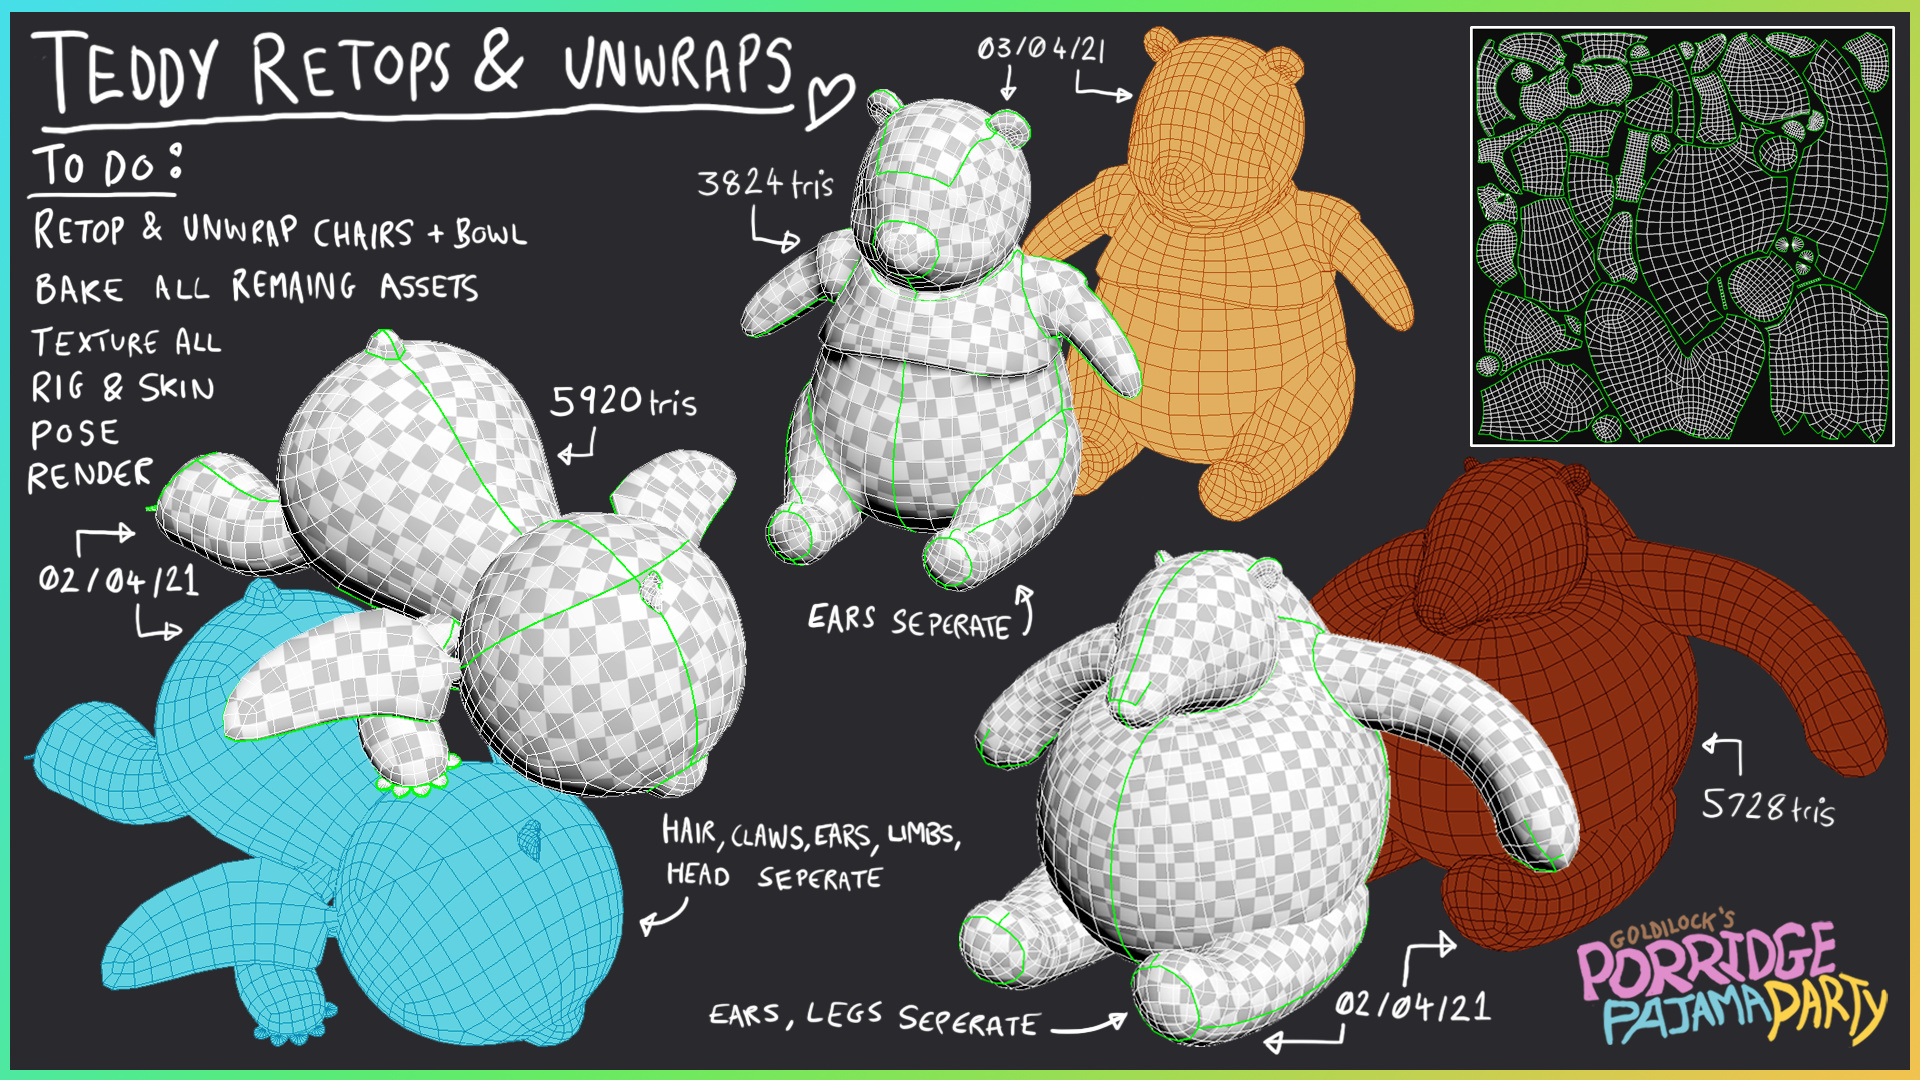
OH I also need to retop and unwrap the teddies and chairs however, I was going to try a Zremesh on all that instead of by hand as its took longer than I thought for Goldi, and then touch ups for joints ect, as I think it will do a good enough job for side assets! So that will be done soon
1 Like
DAY 16
She looks scared at the moment haha!
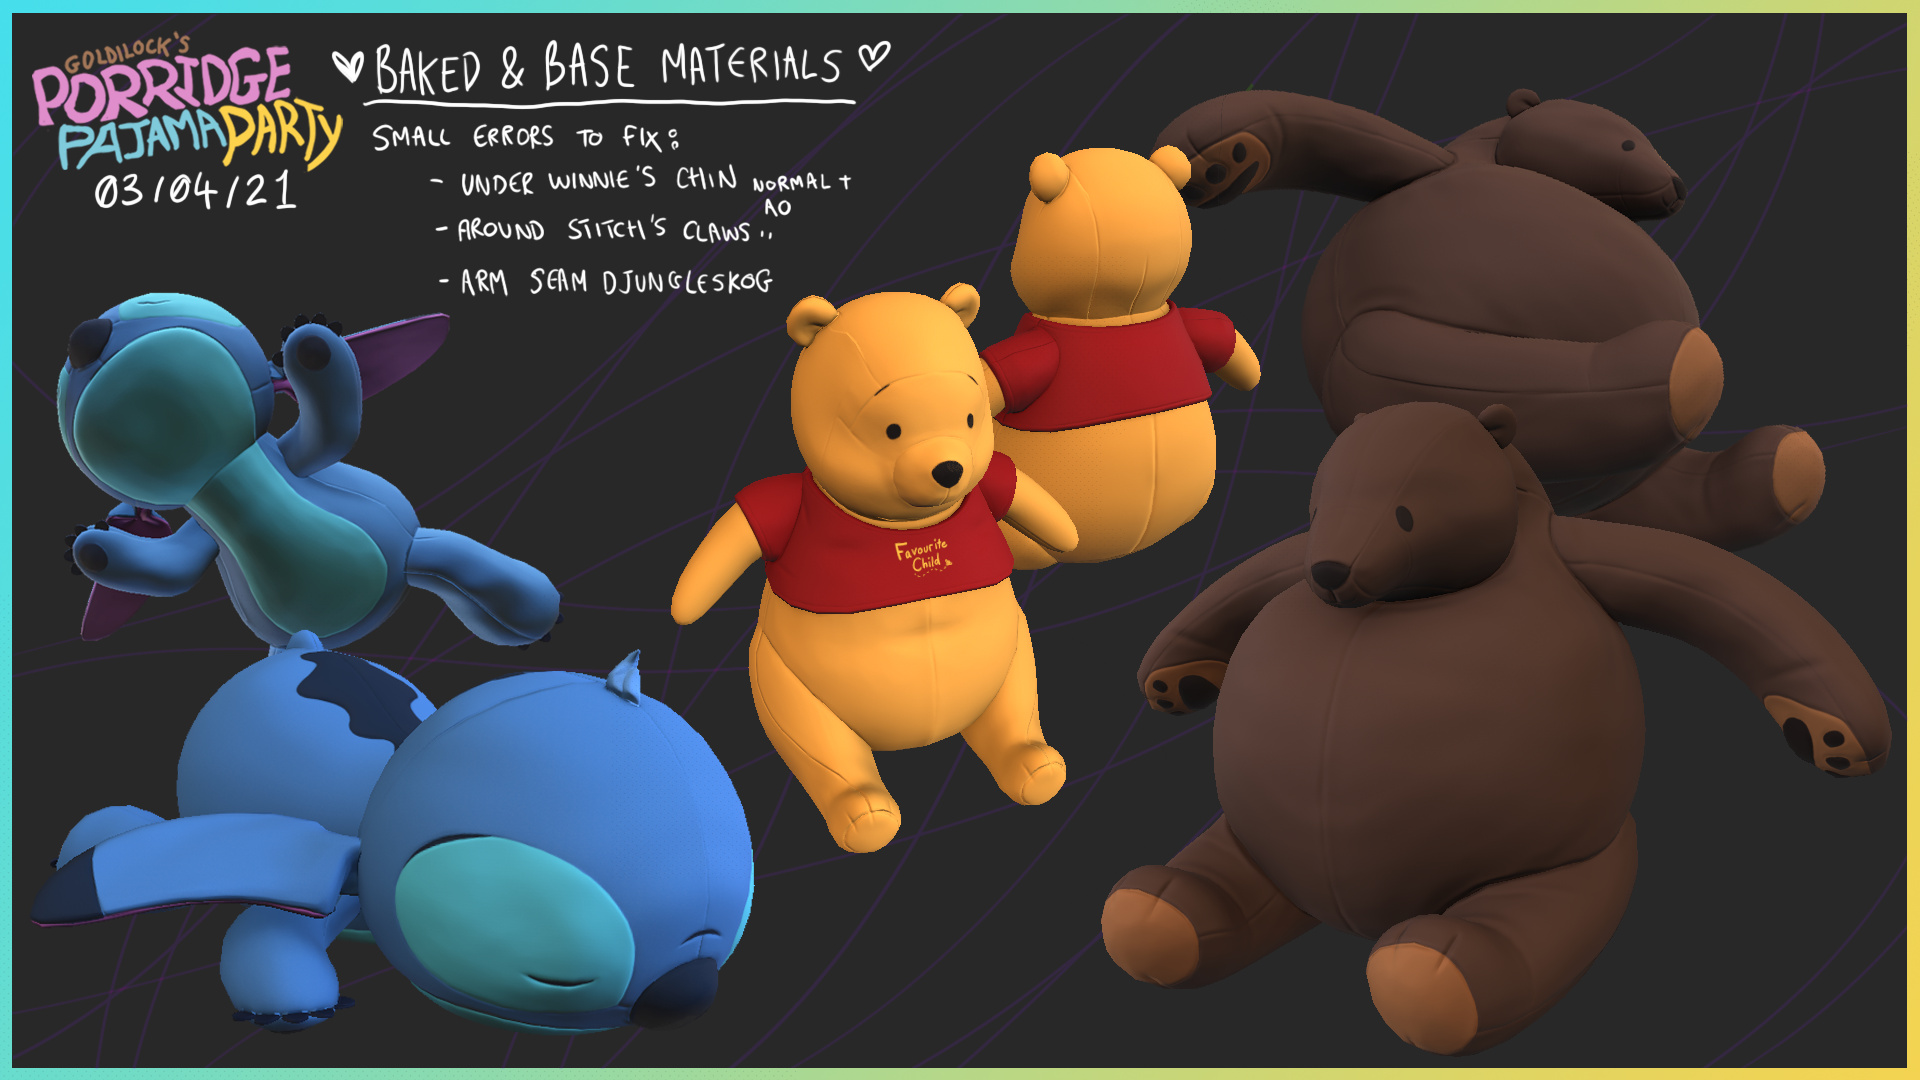
Baking went perfectly. Like seriously, not a single issue. I was actually close to crying it caught me of guard so much that nothing went wrong. I was so used to baking problems during uni that to have it be smooth as heck was a major prezzie. So as it went so quickly (like only 4ish hours) I spent the rest of the day putting in the base colours then got carried away and did base materials instead.
I am IN LOVE with the hair clip. I was trying to make that like “jelly” plastic with the glitter in it, and the tutorial was for designer which I don’t have so I kinda winged it with just metalness + star procedural mask that was duplicated and turned/scaled differently for a few layers with different levels of opacity to make it look like some where “further back” if that makes sense? This was on top of a blend of colour gradients combined with the crystal 1 alpha map to make it look all “gooey” Xd? I decided to put it on the nails as well, just as some consistency and quickness as they are so small it shouldnt really matter that they are the same material since it still looks cute?
I think she is really getting that Gyaru look with the textures coming in, I cant wait to detail more. My new PC handles substance painter like a dream, a couple of crashes but nothing major.
Tommorrow I will either do the other assets to bring them up to this point or keep detailing. I guess time will tell!
1 Like
DAY 17 & 18
A little catch up today and yesterday, did the retops and unwraps of the teddies, and then baked them and put base materials on them. So I think quite a lot!
I did in-fact try a Zremesh for retop and it was, very mediocre. It was faster then fully by scratch but there was a lot of clean up and altering in my opinion and you’l notice I had to work the topology around the UV seaming I planned by connecting certain tris ect. which while unsightly, isn’t bad for animation. If this project was focused on props, I feel I would of spent the extra few hours to start from scratch. I am also quite fed up of round/spherical retopping xD its genuinely very annoying to work with as it is very obvious when theres not enough tri’s and also doesnt work well with the 3dsmax, conform relax tool which constantly wants to shrink the toplogy so far that good density distribution becomes tedious.
The unwraps were smooth as hell though. Like theorized, the teddy bears natural patterning seams were excellent at hiding UV seams and made warping non existent <3 Dare I say it was fun! Only not fun part was the things I wanted to be symmetrical were hard to have on the same sheet as things not overlapping as the peel tool likes to disregard purposeful symmetry overlaps and frozen UV’s??? Does anyone know how to actually have UV’s freeze in 3dsmax and no be moved or effected by peeling another UV island in the same map scene? Either its bugged or a small checkbox or something or it really is a matter of detaching or selecting faces OUTSIDE of the unwrap modifier before opening it? Ill have to try that on the chairs!
The bake went decently well, however a few baking issues easily fixed in photoshop on the normal and AO map, (for example winnie’s underarm where the cage intersected itself). I am unsure whether to have this as a 4k or 2k map since all three are on the one. I’m thinking 2K, and 2K for the chairs also to keep consistency of object size importance?
Tomorrow onwards I’m thinking of getting the chairs to a base material point also as I feel I’d become reluctant if I went further with everything else. Im very excited to take everything to the next level texture wise though : D ! I might watch a few youtube videos to refresh certain things as the 2021 version is slightly different from what im used to looking at and its thrown me off.
Note: When I put “day 17 ect” in the top, I’m determining it based on a half way point between an average weekend potter about day, and a 9-5 work day because its neither either strongly, so by my estimate at this point, I’ve probably put in around an average 100 hours work? But that’s “slower” working as not only have I been getting comfortable again using software I couldn’t for 9 months but I’m watching video’s ect. while working so It may be more? It is very hard to gauge!
 DAY 19
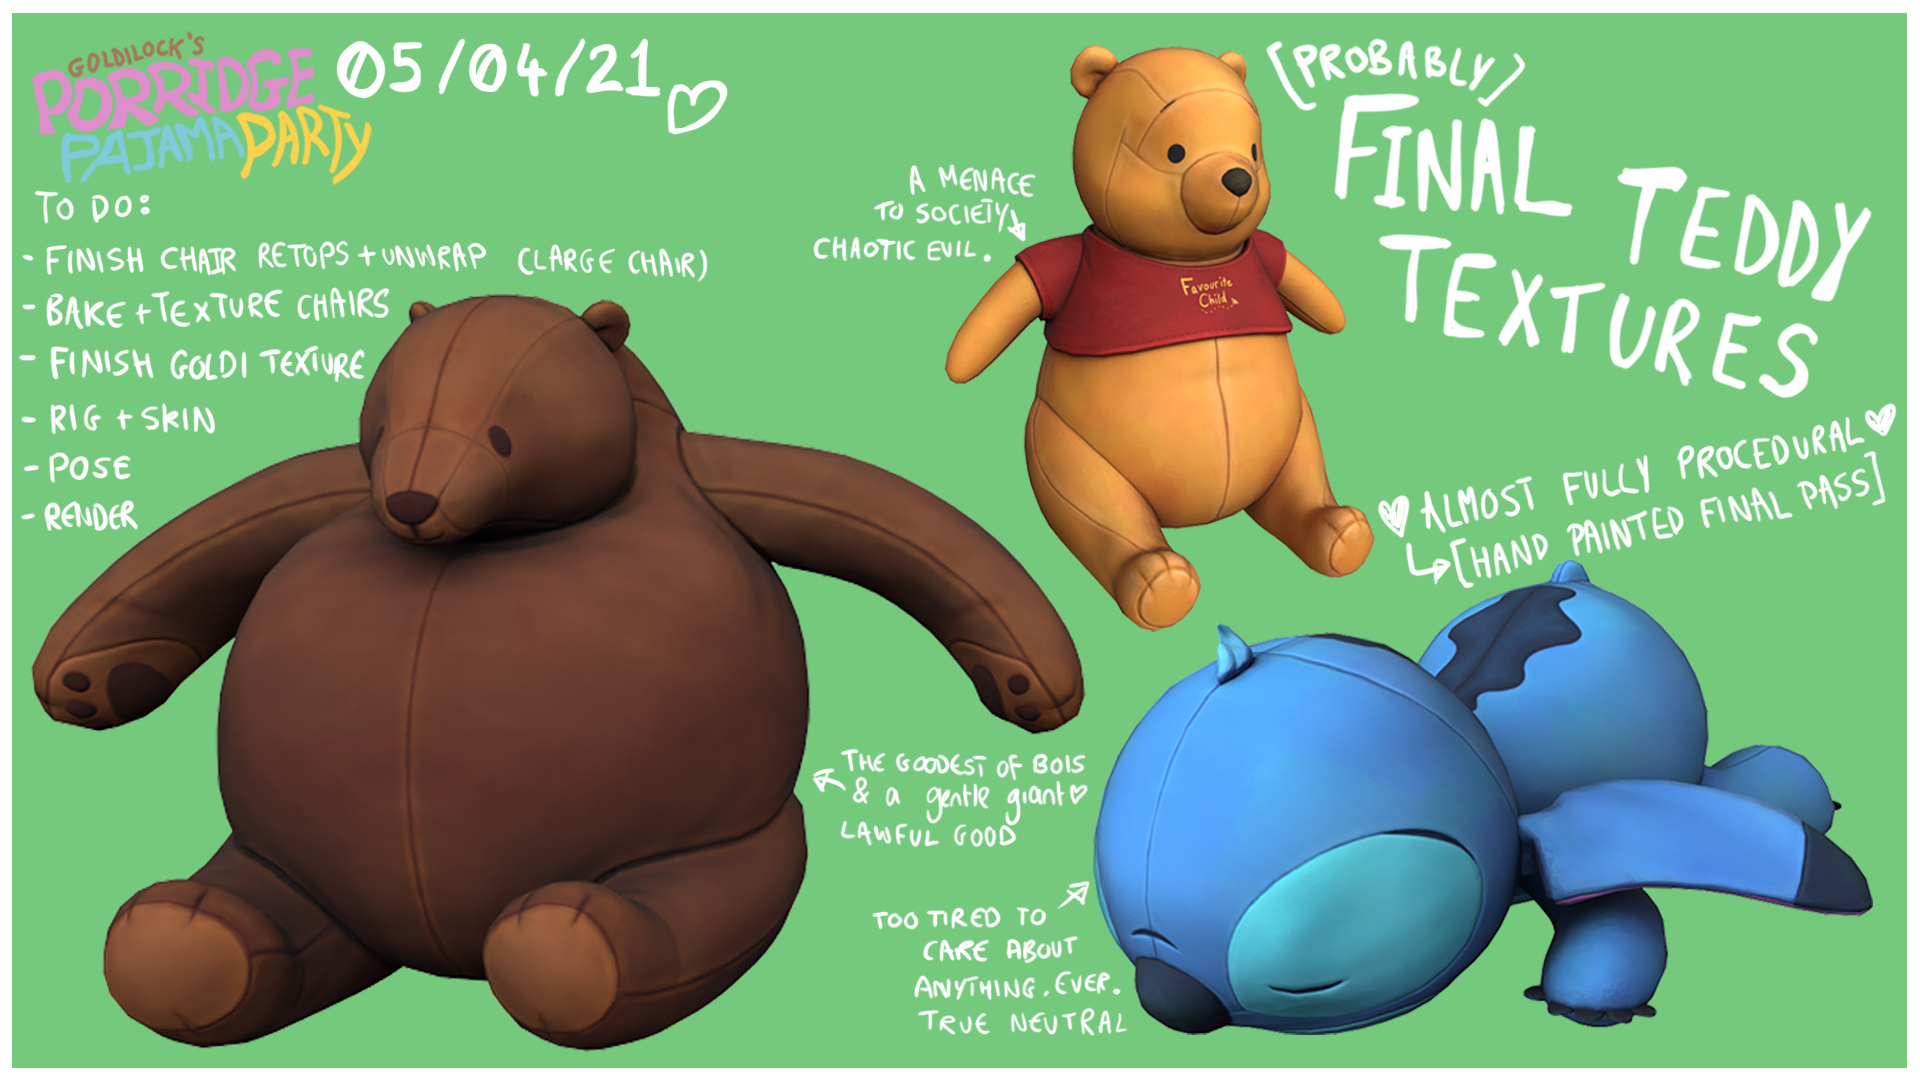
I was meant to finish off the retops and unwraps I started yesterday of the chairs yesterday but I got the sudden urge to finish off the teddy bear textures. Im glad I did as seeing them come to life was very satisfying and motivating! Plus the chair unwraps were going extraordinarily well since I forgot how easy unwrapping non organic and static props are…It was a nice change of pace haha.
The textures look a little less then how they do in viewport, like in 3D they look awesome and you can see a lot more colour variation. I followed a tutorial that was in my recommended on making “ghibli” style textures in substance painter on youtube by Stylised Station. Watching the short intro tutorial was more then enough to remind me how substance works and some awesome looking painted procedural workflows/grunge map steps! I’d highly recommend it! I actually thought it wasnt enough so I added some more gradient maps and generators, then I wanted some more detail so went to use a curvature map to get into the seams but it was so robotically generated looking that I did it by hand instead and loved it a lot more. (Hence the hand painted final pass making this not fully procedural, however I have the smart materials saved to put onto goldilocks).
Tomorrow I’ll defiantly finish up those chairs as I am looking at the date mildly concerned.
The seams on the teddy bears helped alot for texturing however in places didnt match up perfectly UV wise which was a bit of a headache to camouflage and work around, I’ll know that for next time!
1 Like
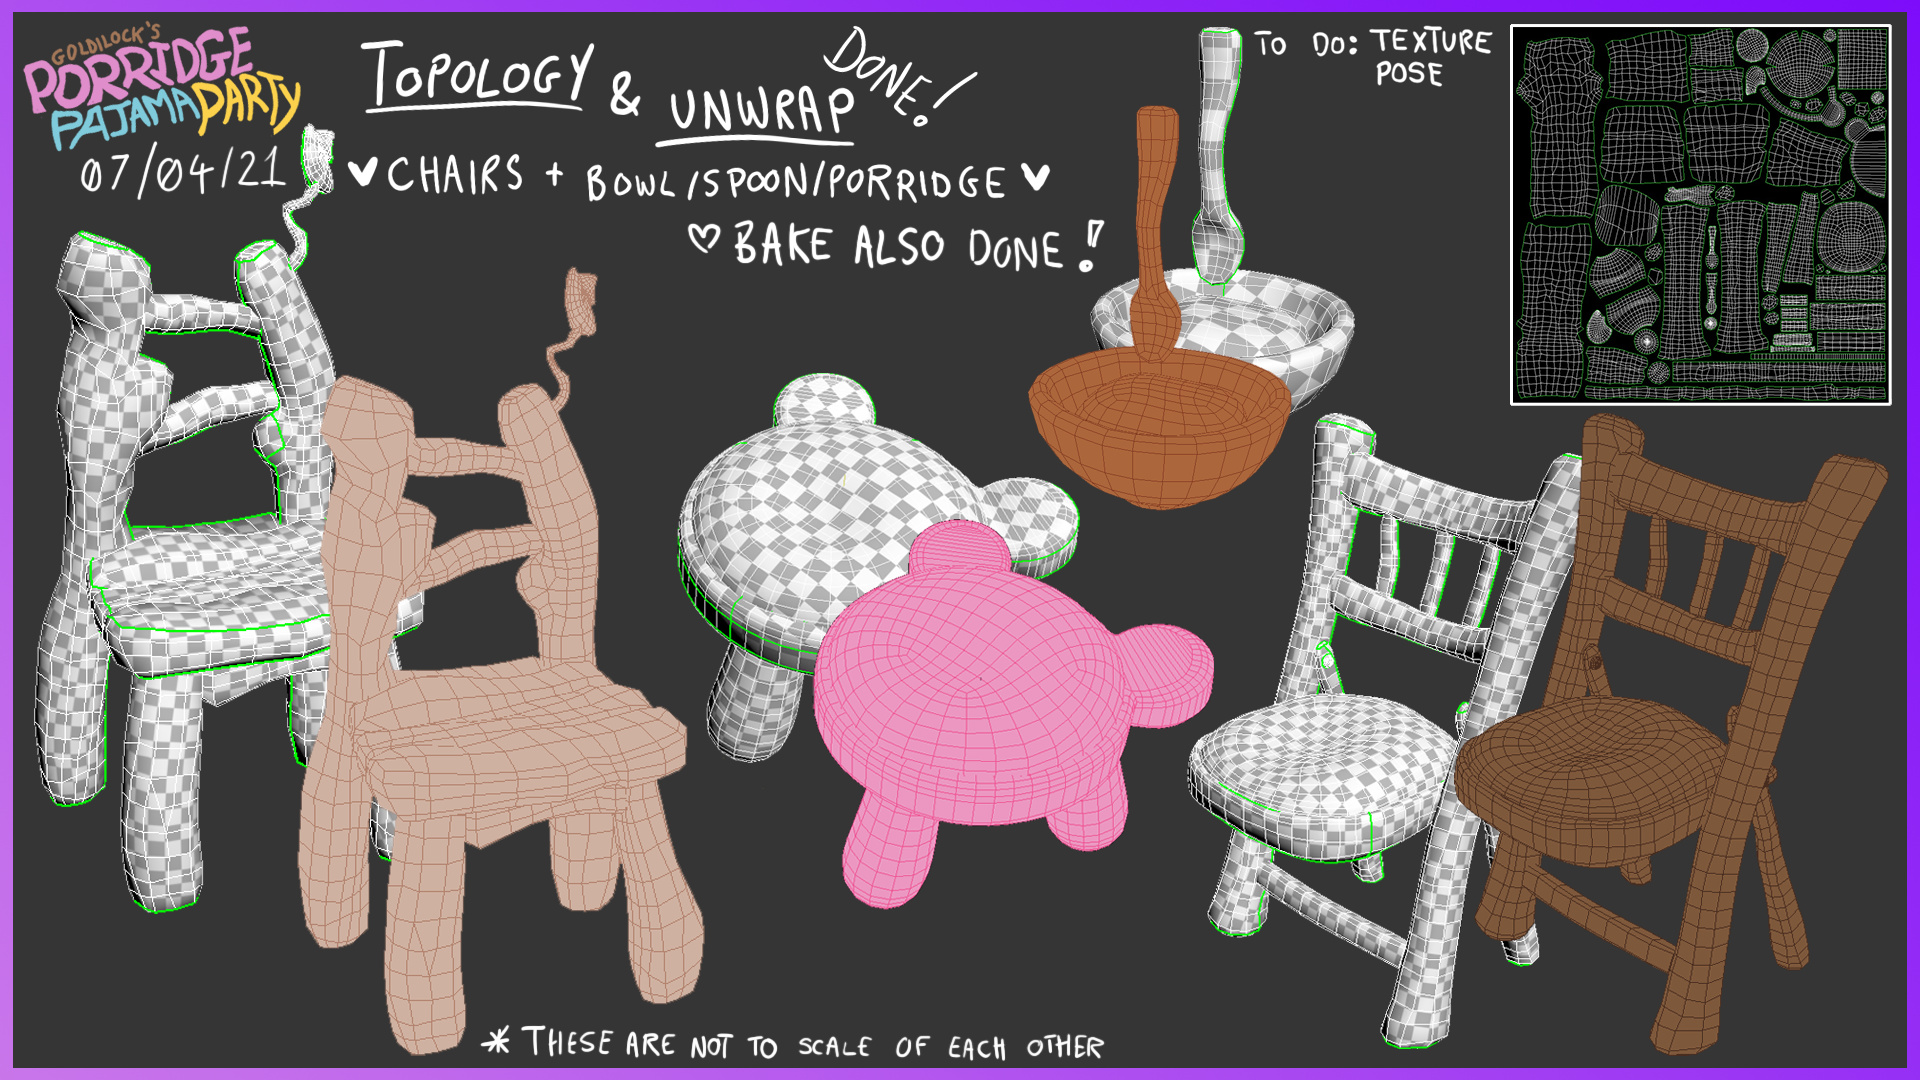
DAY 20
This date crosses over with the 6th as this was done on and off with other things such as texture work on goldilocks and and rigging/skinning of Goldilocks, which is proving to be quite difficult…I’ll get through it, I’m just not trained in animation or rigging ect. at all and I feel like I wing it all the time just with brute force. Especially 3dsmax which I know for animation and rigging isn’t as friendly as its counter part Maya. A lot of my classmates raved about the skinning process in Maya but I wasnt taught it, and when I wanted to learn it myself, theres no way for me to afford it :’)
So “funny” story about these retops, I pretty much didn’t use the Zremeshed mesh at all and basically altered it so much it could of been from scratch. Lesson learned, it’s probably just easier to do it from scratch… Theyre OK retops. Just ok in my opinion. They aren’t the character and I got really stressed by how quick times going to I have rushed the process a little to be honest. Theres some empty space on the UVs and it frustrates me to have to stop myself just to avoid stress. Its OK. Just ok. Bakes were lovely though! Had to do it twice because I forgot the bowl ect…but very nice bakes!
I will post more updates soon as I am doing time consuming things at this point. I want to show things at relatively big progress points. I will show my finished skin/rig and finished Goldi textures, as well as the finished chair textures when done. Then after that I’ll download a free trial of marmoset toolbag and start rendering and presenting phase.
Question: Is it ok to bring the final render from marmoset into photoshop to add a white border and little logo in the corner or does that count as editing/overpaint? On the same strain does editing the brightness/contrast count as editing (I presume so)? I just want to make sure as to not break that overpaint/editing rule! Thank you in advance