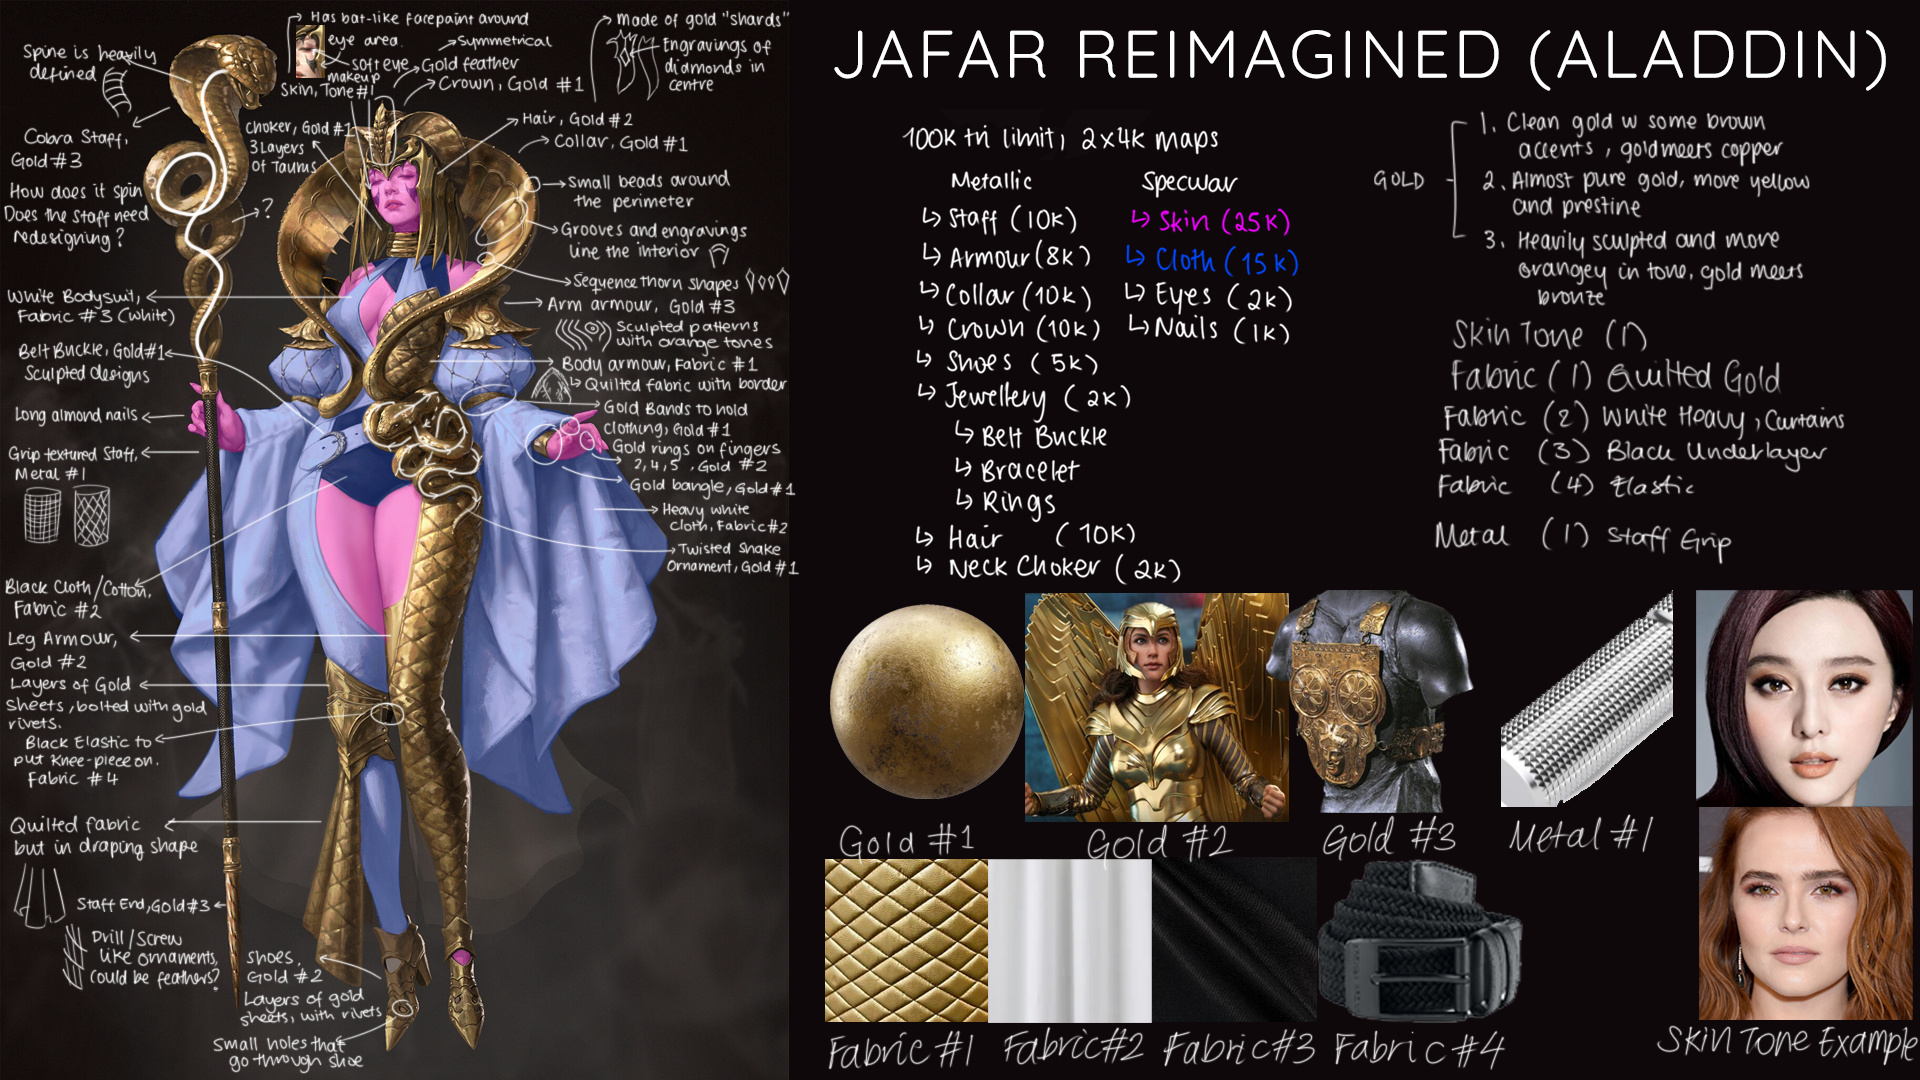
Day One of the Fairy-Tale Reimagined Challenge starts with breaking down the concept to build an asset list. This created a budget for each asset and where it would be allocated for the 2x 4k maps. I also researched into the different types of materials I would have to include to create this character which will continue as the process carries forward.
I hope you enjoy this development for the Character and I’m open to name suggestions (the best I have is Jafara xD), really looking forward to seeing everyone else’s characters too! Good luck everyone!!
Concept and Inspiration
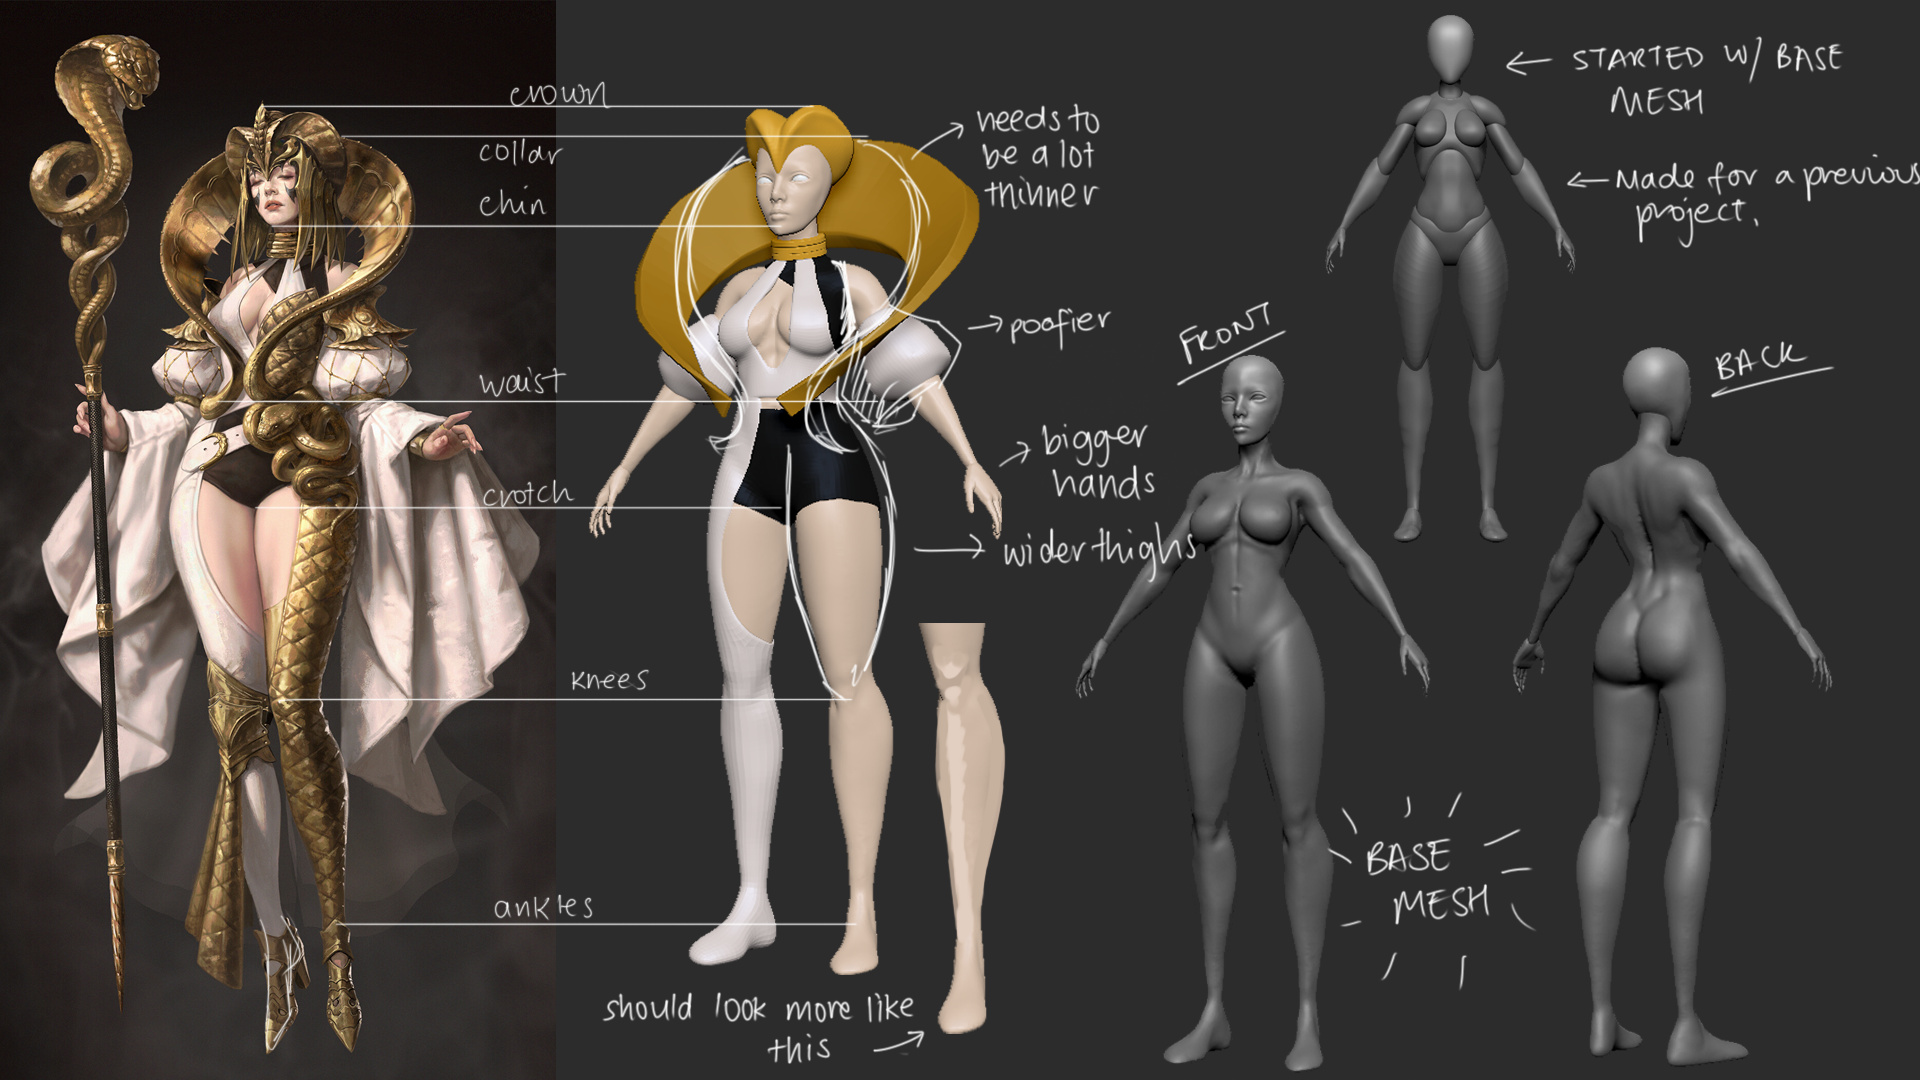
While completing research about this project, I was fascinated to find out that the original story of Aladdin and the Magic Lamp was set in China. I wanted to create a character that represented the villains of the Fairy-Tales as they are just as important to the story as the hero! Due to the time constraints and university modules, I’ve decided to choose a concept that I found on ArtStation by the extremely talented Dai Nak which is available here: https://www.artstation.com/artwork/v1QPaD This immediately brought Jafar to mind and I thought it would be brilliant to portray a powerful sorcerer as a woman.
A Little About Me:
I’m Jess (She/Her) and I’m a second year student at Birmingham City University studying Games Art. This is also my final year (ahhh!), but it also means that my Final Project is coming up which means that I don’t have as much time to spend on this character as I would’ve liked to, so I’ve decided to use a concept instead of creating my own.
I come from a background of 2D character illustrations, in fact this is only my 3rd 3D Character so I’m very much looking forward to the challenge. If you have any feedback or would like to chat with me, just drop a message!
Hey everyone! Getting really excited now that the concept is broken down, I can start with production!
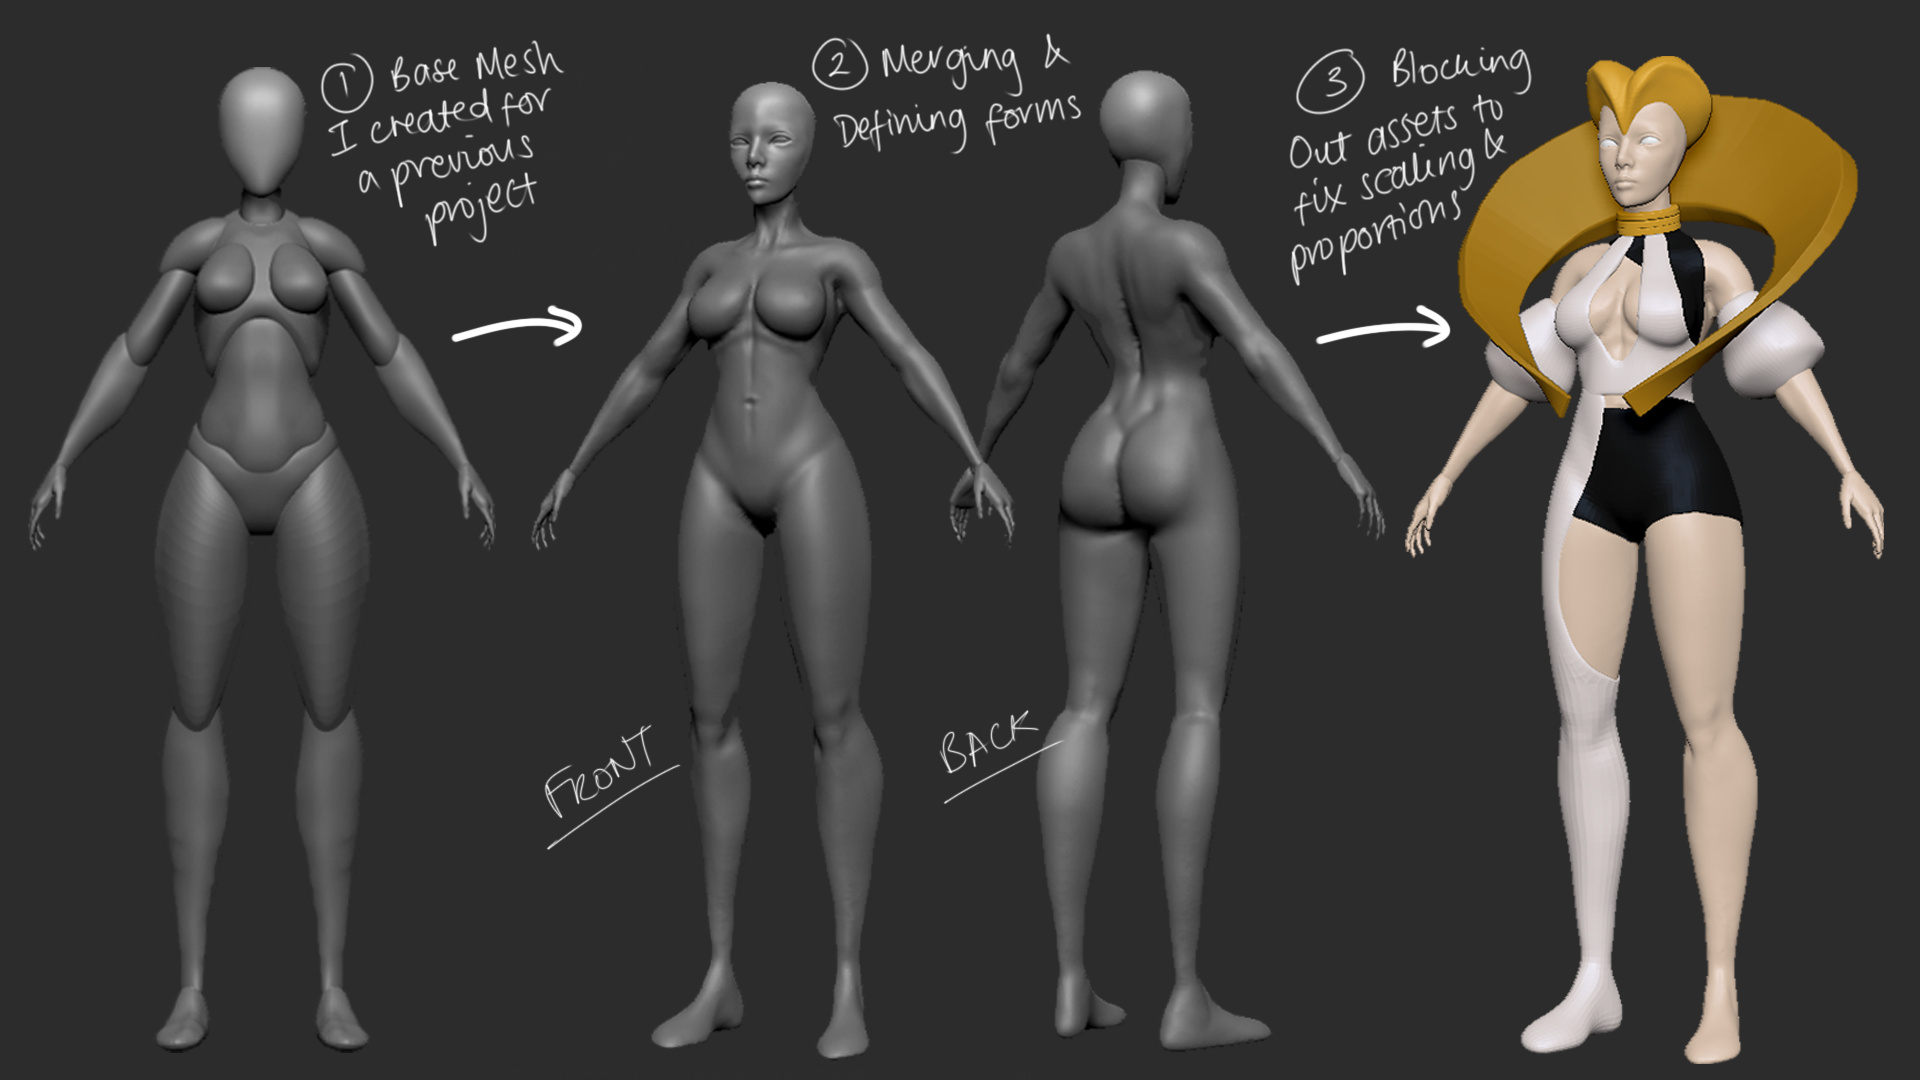
Day Two included blocking out the base mesh of Jafara (temporary name) which will help to determine the sizes of all of the other assets.
I started with a stylised female base mesh that I had created earlier this month as a study, I created it with heavy references to this post by Salvatore Ditrani: https://www.artstation.com/artwork/zABRd2 and you can download his base mesh at the link. Because the reference has slightly more realistic proportions (except the legs), I pushed around most of the forms to reflect this further.
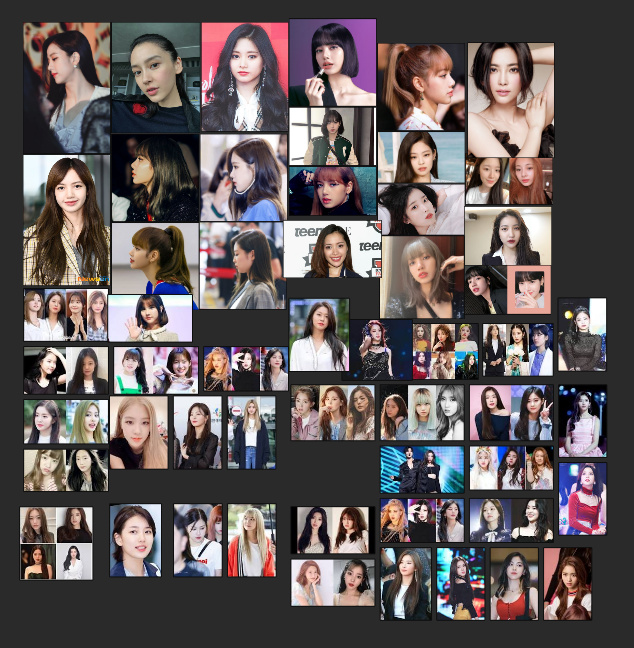
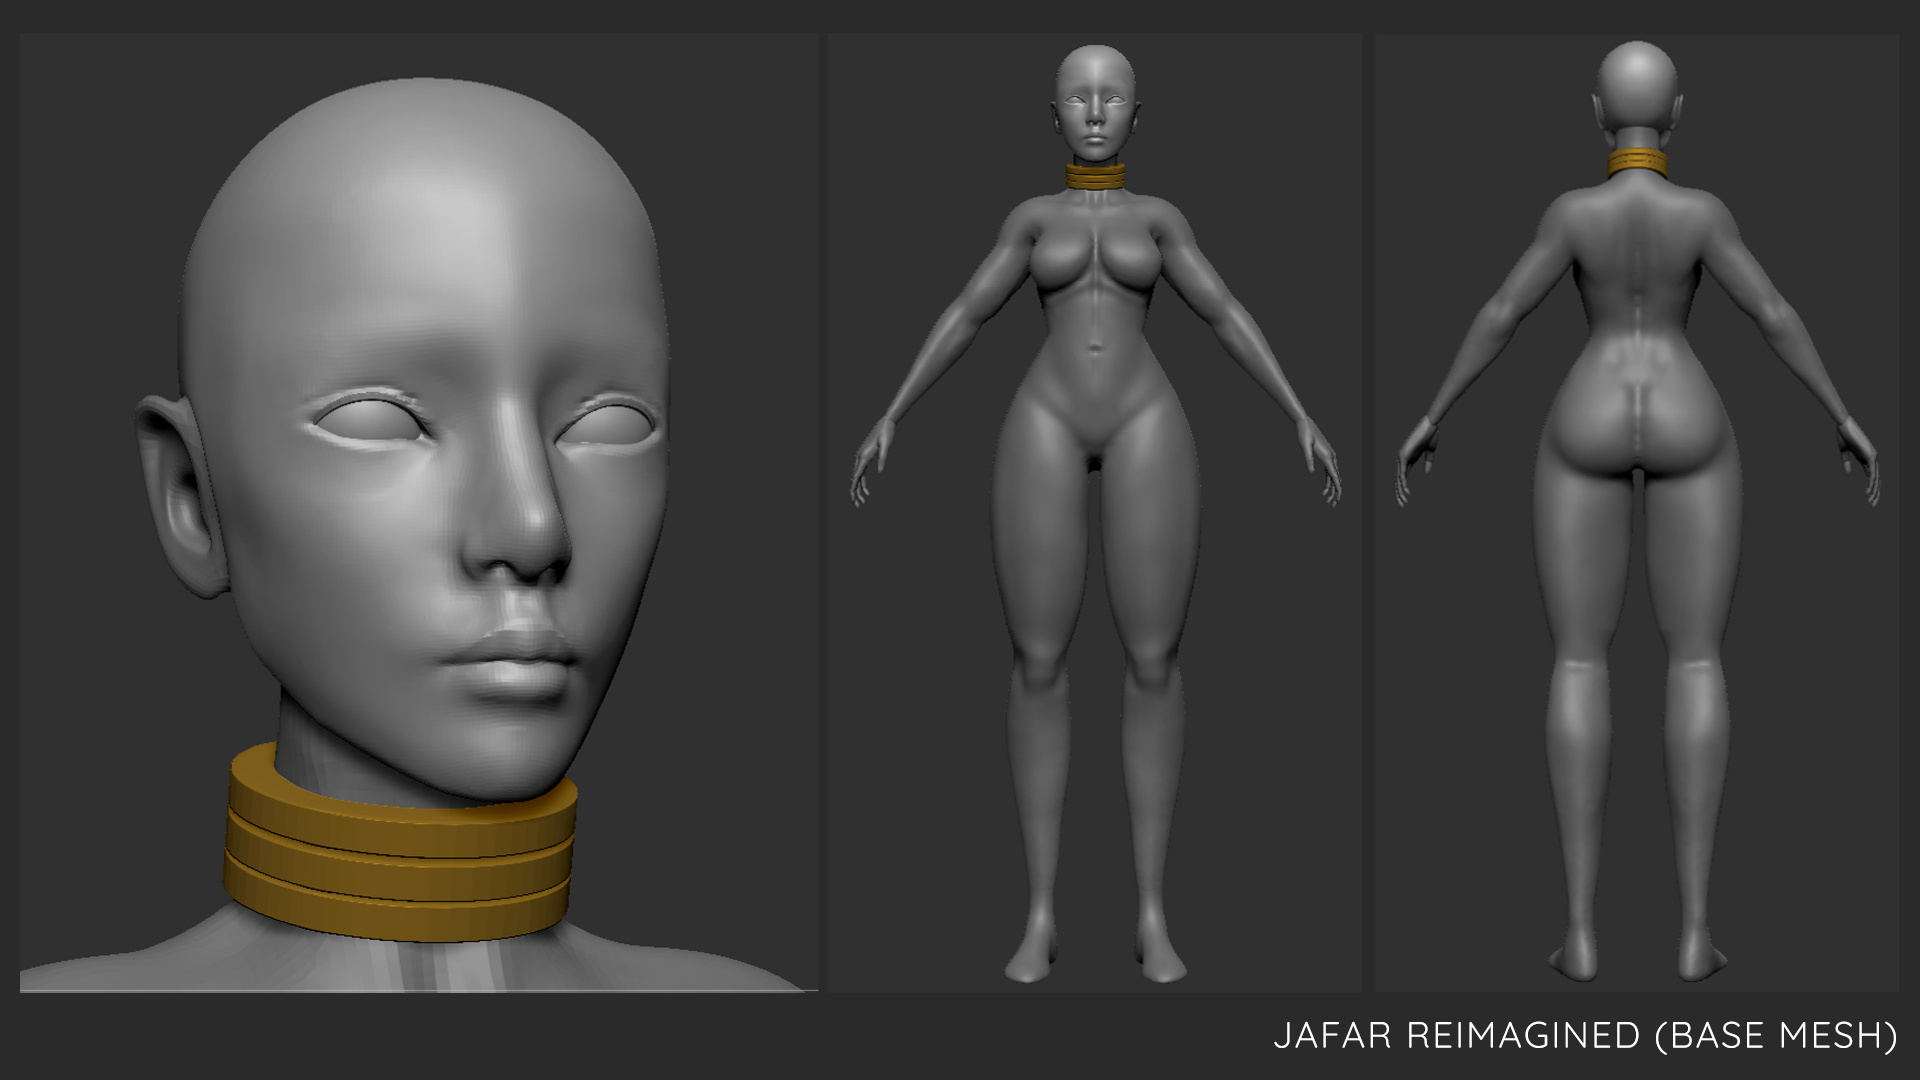
Once I was happy I merged each subtool with a 512 dynamesh and began to sculpt in the muscle definition, this is important to help create believable anatomy, especially when creating a fantasy-realistic character. I kept the head and hands as separate subtools so that I could have them on a higher dynamesh level to retain the detail. With the face, I used many references to Korean Idols and East Asian features - this will be built on further as production continues.
I knew something looked off, so I decided to block in some of the major assets, like the collar and the crown, to help determine proportions better. I created the collar by appending a sphere and then creating a Cube with the ‘Initialise’ function, allowing me to import the shape with a set number of subdivisions. I moved and scaled the cube into place and then used the ‘Bend Curve’ deformer to shape into the rough shape.
From this very basic blockout, I can compare it to the reference closely in Photoshop to determine where I need to push/pull the base mesh to better resemble the concept. In the next update, I need to: widen the thighs, make the shin muscle longer, make the face slightly more round, scale up the hands and possible make the arms longer.
I’m really happy with how it looks so far, next I’ll be going onto retop so that it’s able to move into Marvelous!
I struggled a little with refining the body shape because the concept was in pose. So I decided to use a ZSphereRig in ZBrush to pose the charcter easily!
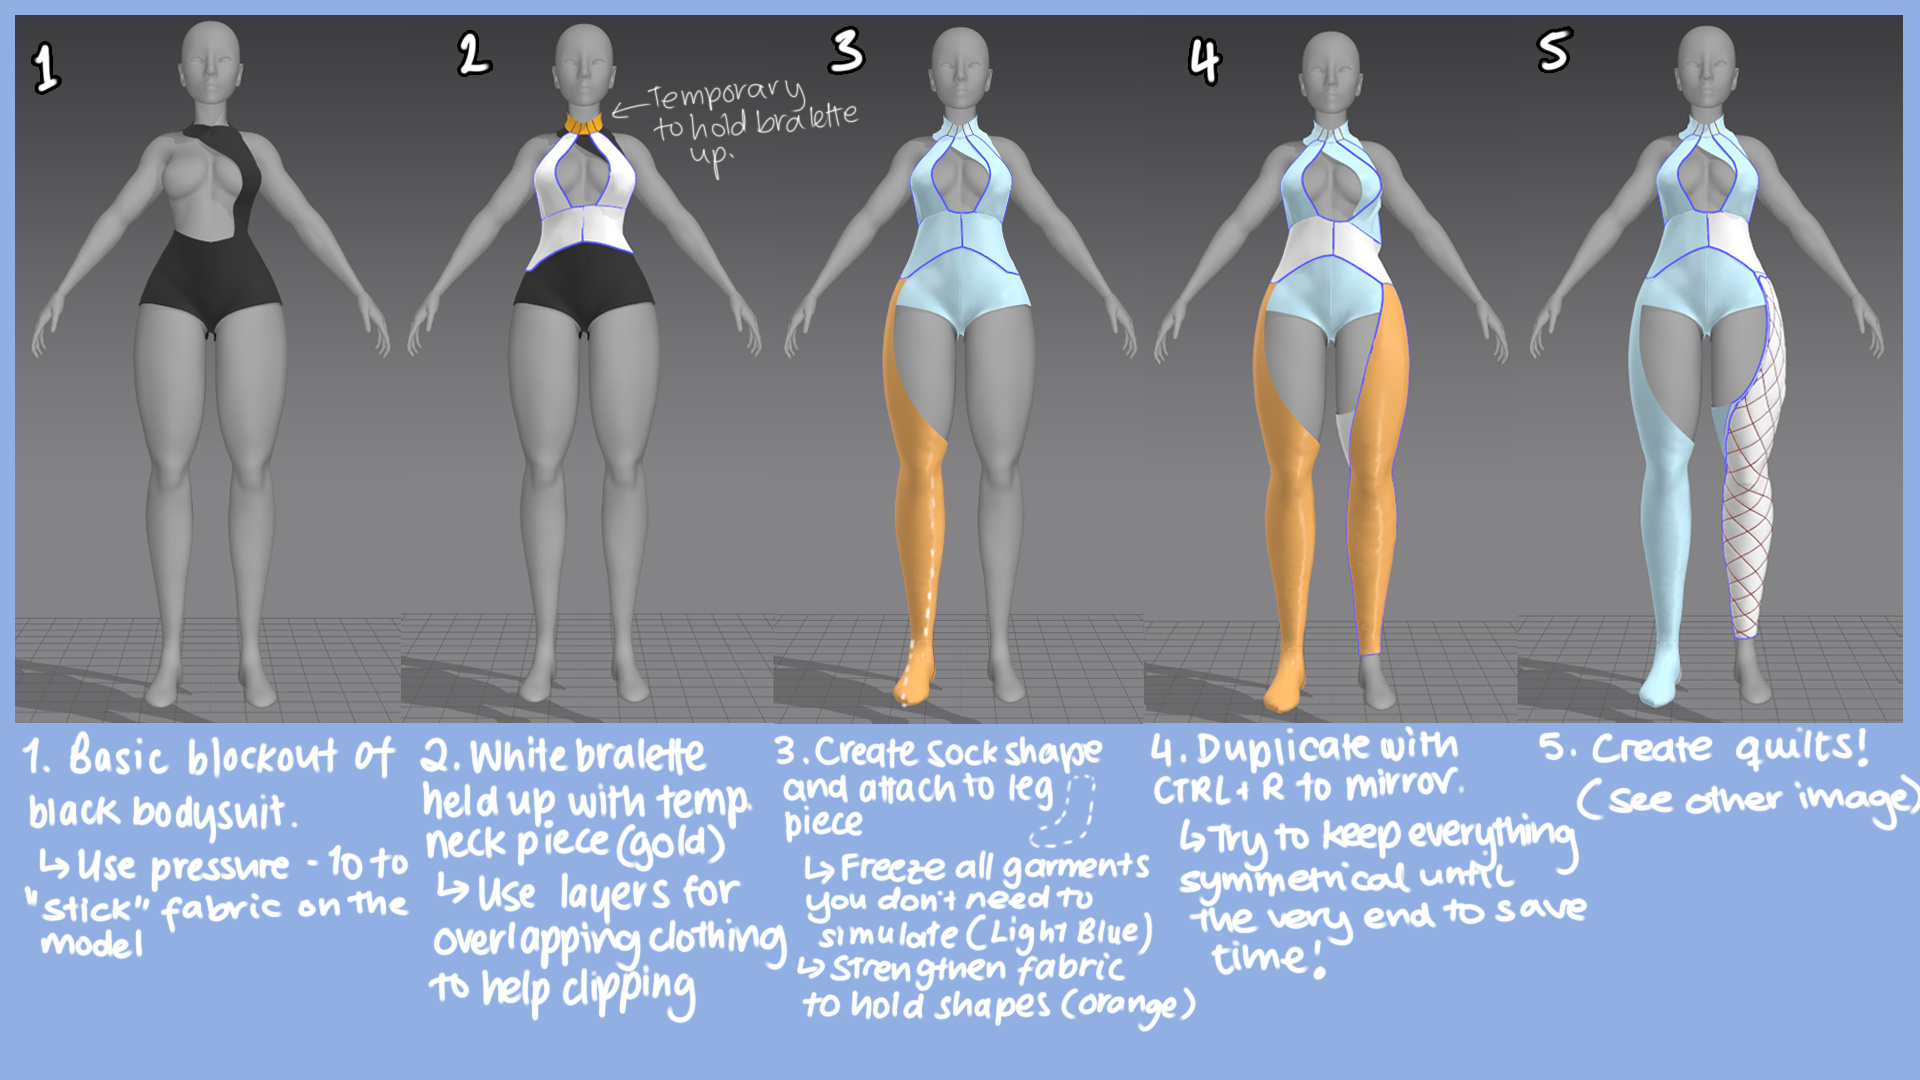
I’ve done a fair bit of fabric work in my previous projects, but nothing like quilting. I had to research a lot into the method, but I’ve found a really great way of achieving it and I’m very happy with the result. I think it could still use some extra touches in ZBrush but it’s a great base to work from.
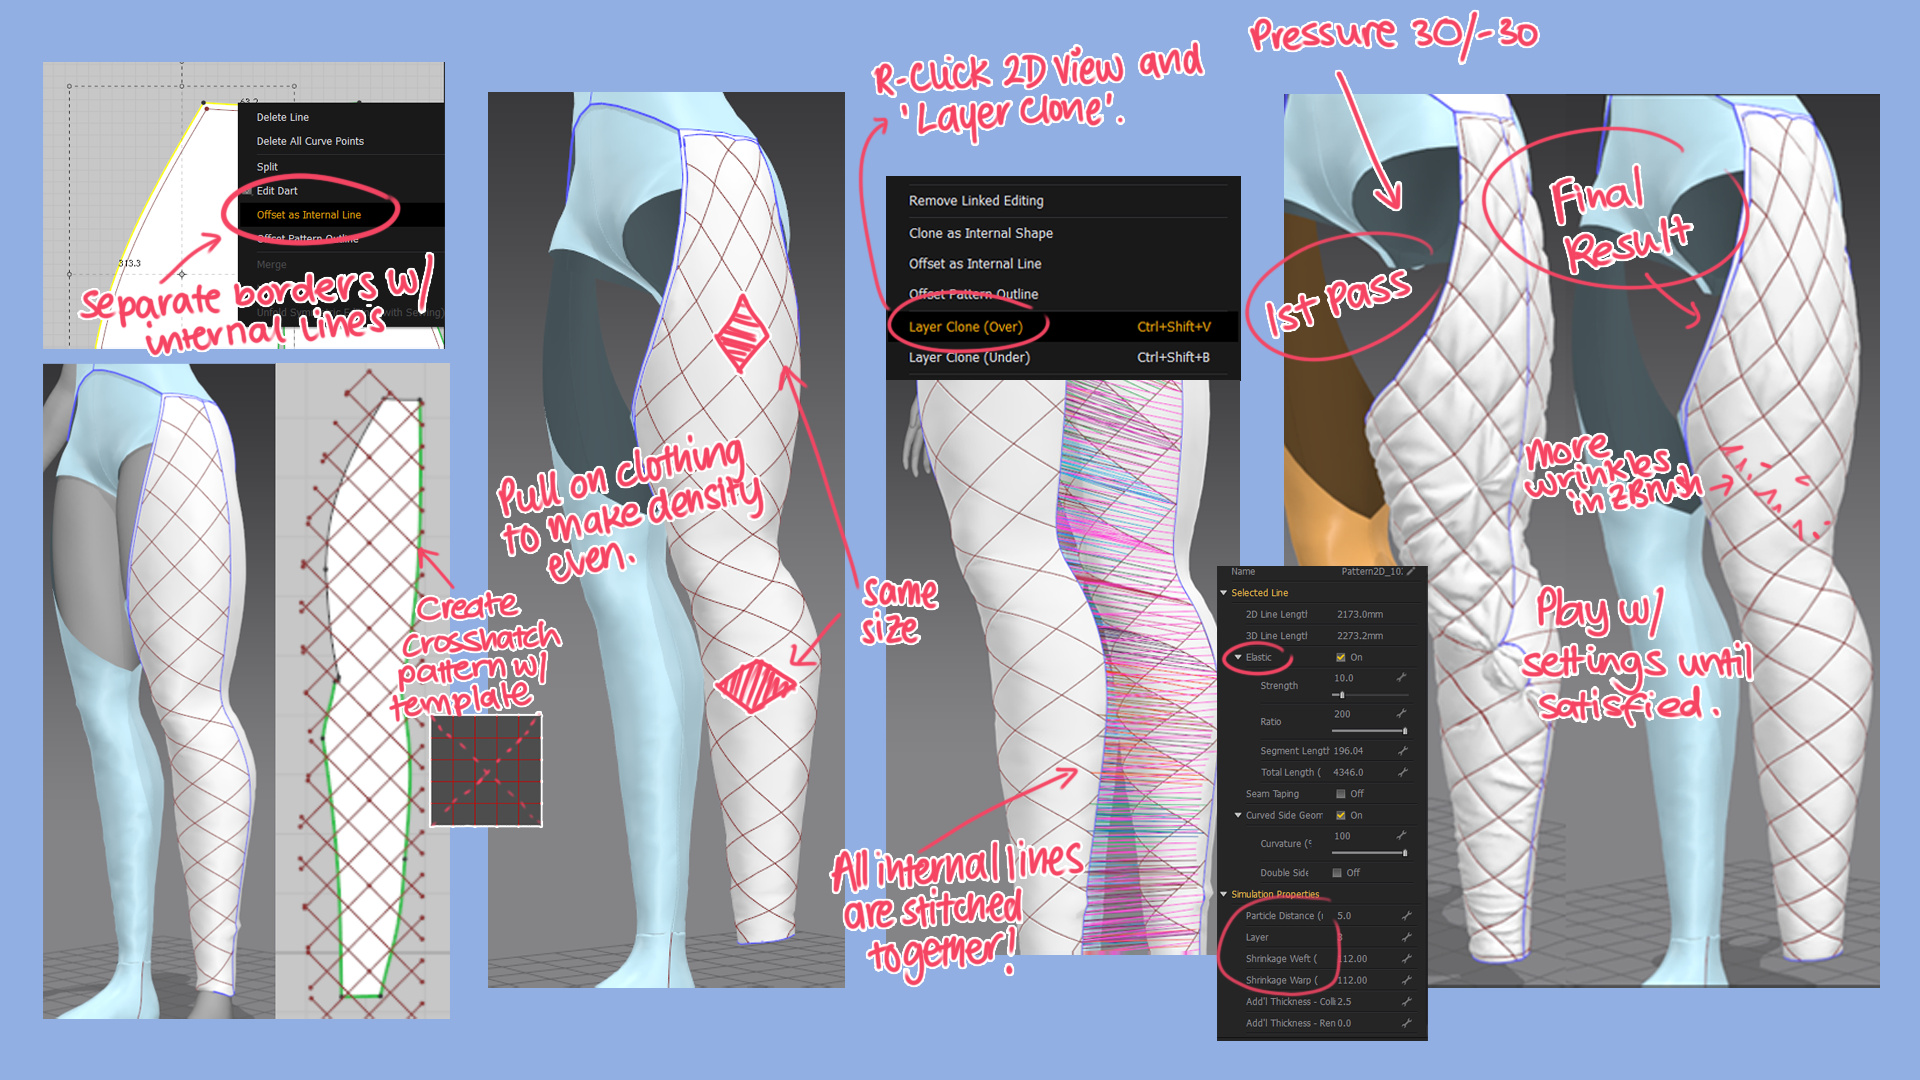
If needed, separate the areas that you do not want to be quilted. For me, this was the border of the leg piece which I offset with an internal line, and then used ‘Cut & Sew’ to make it a completely separate piece.
Next, create your crosshatching pattern. Start with a square shape and select two parallel lines, r-click and ‘Offset as Internal Line along Curve’, set No. Offsets to 4 (an even number is preferred but not necessary and then do the same for the other two parallel lines.
You can now create diagonal internal lines that snap to the points where the offsets meet. This will act as your crosshatching pattern. (In hindsight, you could just use the grid pattern and rotate it 45 degrees for diamonds). Copy over the pattern to the leg piece and duplicate so that the pattern will tile. I used Ctrl+V, then r-click with a specific length to save time.
Pull and edit the pattern to ensure that the diamonds are as even in shape as possible. It’ll also help later with UVs to ensure that the texel density is evenly distributed.
Once happy, right click the pattern in the 2D window and select ‘Layer Clone (Over)’. This will stitch all internal lines to the respective one in the copy, saving A LOT of work. Before simulating, use these settings:
Bottom Pattern:
Pressure -30, Elastic ON with Ratio 95, Particle Distance 10
Top Pattern:
Pressure 30, Elastic (Optional test with different values), Shrinkage Weft and Warp to 105, Particle Distance 5
Simulate and mess around with values until you get a good result!
Next to do is the sleeves and the final quilted chest piece, then onto sculpting more of the high poly!
As always, feedback and critique is welcome! Hope this helps some people :))
Sorry for the lack of updates everyone, been really busy with my final project at university that I unfortunately haven’t had much free time to spend on Jafar
I really hope that I can get back to this really soon, thank you!
 Concept and Inspiration
 A Little About Me:
 Links: